The Invasion of Brunswick 1808
A Hypothetical Wargames Campaign
By Jeremy Drage, UK
| |
The nomadic lifestyle of a military man is not conducive to club wargaming or regular partners in blood and treasure. Searching for a mechanism for linking a number of battles over the years has led me to set up an hypothetical campaign set in central Europe around the times when Napoleon’s powers were at their peak; (I am a Francophile in my Nineteenth Century guise!) My mind drifted back to my youth when I used to read ‘Hyboria - a Campaign that grew’ in Battle/Military Modelling. Whilst not a fantasist, the concept of producing a challenging and sustained campaign with unpredictable battles appealed. Add the reality of the great Napoleonic personalities, the variety of troop types and the freedom to select different opponents from the historical golf bag and I had something. I hope that my experiences gathered over two years in this campaign that produced three major and seven minor battles will both interest you and fire your imagination - it did with me as it produced this article and a sequel campaign.
I used my normal wargames rules for the battles. The campaign was run on simple rules on one 1:100,000 map. Movement rates were fixed for each type of division and brigade, nation by nation. I wrote a campaign plan for each country and tried to stick to it despite my omniscience. I used a lot of military judgement, particularly in deciding the outcome of events too tricky to wargame, such as surprise, lines of sight in encounters, communications and sieges. Formations could be in or out of supply and casualties were trickled back to units over time, though the percentage depended on whether one was advancing or retreating. All of this stubby pencil work was quite time consuming, but it was part of the enjoyment as it linked the battles together. I understand that electronic ‘stubby pencils’ such as ‘Follow the Eagle’ can do all this work for you..Ed? The historical purists may point out that certain commanders were either too junior or dead in 1808 or that Britain was not using corps, but that is the joy of a mythical campaign. One can use one’s favourites and even make up a few German divisional commanders altogether!
The Duchy of Brunswick was one of the German vassal states created after the humiliation of Prussia in 1806. It was not particularly strong militarily or economically so it had not been garrisoned by the French. Geographically it had Westphalia to the west, Hanover to the north and less importantly Bavaria to the south and Saxony to the east. Looking to cause trouble for Napoleon on the continent, the British government chose to exploit nationalistic tendencies in Brunswick and Hanover (the home of George III). Landing at Bremen, three British corps (including a Brunswick émigré division) and a cavalry corps pushed south to Hanover in May, overcoming light opposition. They were joined by a Netherlands corps formed in northeastern Netherlands from the anti-French units there and exiles landed by the Royal Navy, which marched unopposed to Hameln, reaching it on 1 June. The home country formed its regular and militia troops into three corps; one at Hildesheim, its small cavalry corps to the south facing the French threat from Bavaria and the last forming hurriedly in the capital, Brunswick, to the east.
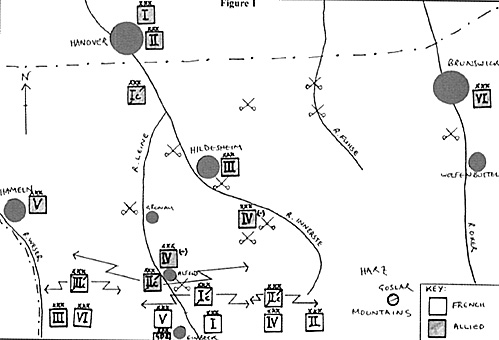
Napoleon gathered the Grande Armée in Bavaria, issued a warning to Britain to withdraw and to Brunswick to resist the British ‘invasion’ on pains of defeat and annexation of the Alfeld province in the southwest. Mobilisation continued, so at dawn on 1 June, his army of the Guard, six infantry and three cavalry corps crossed the southern border to restore order in the way he knew best (see Figure 1).
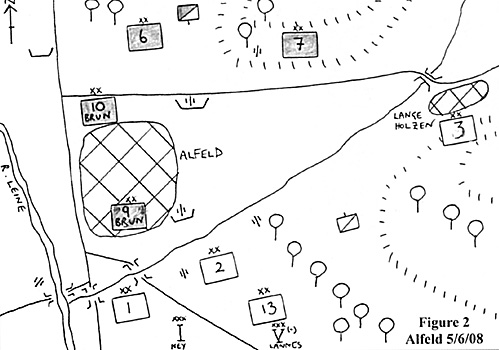
GroundThe terrain of this part of Germany is a mix of woods and farmland. The rivers Weser, Leine, Innerste, Fuhse and Oker and their tributaries dissect the Duchy into ridges and vallies trending north-south. All of these rivers present an obstacle to movement, making the bridges crucial - as the forthcoming battles showed. There is a good road network for the period and two main towns: Hildesheim in the centre and Brunswick in the east. Alfeld is the gateway to the Duchy on the French line of advance from the south but the Harz Mountains restrict the line of departure in the east. ORBATThe diagrams below show the balance of the corps. The divisional structure of each corps varied and is not shown here in full, but an indication of the make-up of each corps is shown. (The code for divisions is G=guard, I=infantry, C=cavalry, so Yorck’s IV Brun Corps which has one guard infantry division, three infantry divisions and one cavalry division, is shown as ‘1 G, 3 I, 1 C’. All corps possessed artillery.) The campaign focussed on the grand tactical/operational level of war and hence the army and corps commanders. The divisional commanders who contributed to the campaign will come to light in the later descriptions of the battles. Situation on 1 June 1808As with most things at that time, the French concentration outpaced the Allies’. They crossed the border on three axes; in the west Lasalle, Davout and St Cyr advanced to cut off Orange from Hildesheim; in the centre, Napoleon, Murat, Ney, Lannes and Mortier pressed directly towards Alfeld and Hildesheim; in the east Kellerman led Oudinot and Soult in a sweep across the Innerste to the east of Hildesheim. Facing them were Roder’s cavalry screen in the south, backed up by Yorck at Alfeld (two divs), Bad Salzdetfurth (one div) and Wesseln (one div) blocking the Leine and Innerste valleys. Picton’s corps was in support at Hildesheim. Orange was somewhat isolated at Hameln in the west, keeping open a link to home (see Figure 1). Wellington was having a ball (!) in Hanover when he received the news of the French strike, and immediately ordered Hill, Craufurd and Uxbridge to concentrate at Gronau in the Leine valley. The Brunswick government was unlikely to have completed the formation of VI Corps and send it to Hildesheim for a week. Napoleon’s plan was bold yet simple. A strong centre would threaten Alfeld and Hildesheim and draw Wellington on to himself. Meanwhile his trusty subordinates, Davout and Soult, would lead their wings in sweeps to destroy outlying corps and close in on the flanks if not behind Wellington’s main body. Napoleon felt confident of holding Wellington through manoeuvre and the valley terrain until the jaws closed, as they were to remain no more than three days’ march from In the west, Orange was answering Wellington’s call to RV at Gronau and by 7th the Emperor. Wellington had intended to concentrate between Alfeld and Hildesheim, and then push south to contest the border crossing. He was at least a week late and would always be on the back foot. Napoleon had stolen time, as usual. He was one day from the Brunswick outposts, four from Alfeld and five from Wesseln. It would take Wellington this long to reach Gronau and a week to achieve any form of concentration to meet Napoleon’s detected central thrust, during which time four battles had been fought in which the Allies were outnumbered and pressed back, despite some gallant fighting. Early Moves (1st -7th June)The Brunswick hussars watching the routes north were pressed back by Murat and Kellerman’s chasseurs, but the constricted routes ensured that the black-coated cavalrymen were able to identify and report the axes being developed by Napoleon’s centre and right wing. St Cyr was also detected on Napoleon’s left but he was assumed to be the flank guard as the move of Davout’s powerful Corps up the Weser went undetected. This oversight was not to be disastrous for Wellington but Roder’s poor reporting of the hostile act could have been. From his Corps HQ in Alfeld, he gathered reports from his three divisions on the night of 1st June and sent an ADC with the news, not to Wellington in Hanover but to his Duke in Brunswick! Fortunately for the Allies, the ADC conversed with one of Picton’s staff in Hildesheim as he changed horses. This had two effects: a dispatch was sent to Wellington that arrived during the ball on the night of the 2nd, and Picton put his Corps on alert. He was ready when the messenger returned with orders to move forward to Alfeld to support Yorck. As he moved his HQ southwards to Gronau on the morning of 3rd June, he passed first the breaking bivouacs of Hill’s Guards in the parks on the southern outskirts. Then he overtook the sweating columns of Craufurd’s infantry kicking up the dust. They paused to stare at their new general with the large nose who had done so well in India, but had not faced Napoleon before. Leading the way were Uxbridge’s resplendent troopers anxious to clash with Murat’s paladins. They would have a few days marching before they had the chance. Meanwhile, Napoleon was based at Einbeck urging his commanders on to seize the advantage of surprise. His first chances came on 5th June in the centre and on the right. Lannes and Ney were advancing up the west and east banks of the Leine and bivouacked within sight of the town of Alfeld, occupied by part of Yorck’s IV Corps and supported by Kempt and Pack’s Divs of Picton’s Corps on the high ground to the north. Whilst awaiting the French arrival, the town had been fortified and redoubts built. More importantly, the bridge crossing the Leine was blown, preventing Lannes from attacking across the river. He left his artillery to fire in support of Ney and countermarched his divisions to cross to the south. (Only Molitor’s 13th Div was to join Ney during the fight.) At the prescribed H Hour of 8am, the valley was shrouded in mist. This allowed Claparede and Compans’ Divs to approach Alfeld without suffering from aimed fire, though they were impeded by the destroyed bridges on the tributary running south of the town.Fortunately, this was fordable and Zeithen’s 9th Div was pushed back into the town. Ney used his artillery to fill his centre and extended his right with Dessaix’s 3rd Div, which together threatened the flank of the British infantry if it advanced to assist the Brunswickers in the town (see Figure 2).
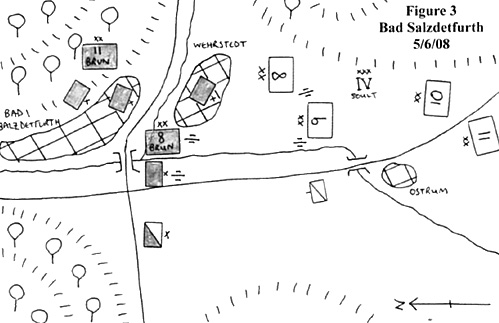
During the morning, both Napoleon and Wellington arrived to face each other for the first time. The former urged Ney on, as Molitor was committed to counter Yorck’s reserve: Pirch’s 10th Div. The French successfully cleared the town by early afternoon. Wellington had two choices: he had the infantry to counterattack against Ney, but not the strength the beat Lannes and subsequently Murat too. His Army was gathering one day’s march to the north, so he chose discretion and broke contact, covered by the Brunswick cavalry, before Lannes could close up and pass through the exhausted Ney and continue the attack. Napoleon’s first aim (Alfeld) had been achieved but the engagement had been indecisive, with 2800 French and 2100 Allied casualties. At Bad Salzdetfurth, Bulow’s 11th Div was joined by the 8th Div detached by Picton and commanded by the Duke of Brunswick himself. The terrain favoured a defensive action against Soult’s Corps, which was constrained into a narrow column of march. It was mid-afternoon before St Hilaire’s 8th Div met Brunswick’s outposts and drove them in. Soult saw there was little room for manoeuvre, so committed St Hilaire to fix the enemy while Legrand, Gazan and Souham closed up. Using the terrain well, Brunswick easily held St Hilaire in the outskirts of the town, causing considerable casualties. As the evening drew on, Legrand’s 9th Div added weight that was countered by Bulow’s reserves. Two brigades of Brunswick cavalry saw off the French cavalry brigade and were able to delay the committal of Soult’s other divisions until after dark (see Figure 3).
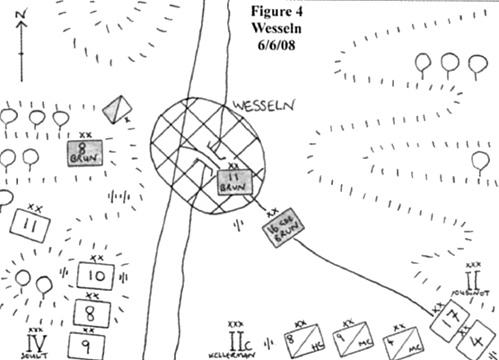
Outnumbered by two to one with the prospect of more of Kellerman’s cavalry arriving, Brunswick decided to withdraw overnight north to the Innerste at Wesseln.Casualties were approximately 800 apiece. The Wesseln position was strong, with hills and woods focussing any French attack on the centre, which was split by a tributary flowing north into the Innerste and dominated by the town. Brunswick, knowing that Soult would follow-up, used his two divs (8th and 11th) to block progress north and called in 16th Brun Gds Div (Langeron) from an axis to the east where no French had appeared. (It was, in fact the one that Oudinot’s II Corps was conducting his sweep on the French right, but Soult called him in also on finding stubborn resistance at Wesseln. Oudinot refused, quoting Napoleon’s orders to exploit space not become attracted to Brunswick resistance.) Soult closed up his Corps, with his two fresh divs (Gazan’s 10th and Souham’s 11th) leading, but it was 1300hrs before he was ready to attack. The odds favoured Brunswick in achieving delay; the terrain favoured defence, Soult was under orders to press on quickly so dispensed with a bombardment, his Corps was spread out along the route, two divs had been mauled somewhat at Bad Salzdetfurth, Kellerman’s cavalry was stuck behind the infantry and Oudinot was refusing the call whereas Langeron was marching hard and would arrive in Wesseln as Soult’s attack struck home (see Figure 4).
Attacking west of the river, Gazan moved straight up the road while Souham swung around to the left through the woods. Langeron’s Div replaced Bulow in Wesseln, giving Brunswick a reserve behind his own Div, his cavalry saw off Soult’s cavalry (Jacquinot’s 4th Med Cav Div), and Gazan and then St Hilaire were held (using the reserve) until the evening when Souham’s manoeuvre sucked in some of the Guards from the town to keep the road north open. Brunswick had the measure of Soult, but he could not deal with good-ol’ Oudinot who had marched to the sound of the guns in the mid- afternoon, despite rebutting Soult’s orders. He approached from the east, joining with Kellerman’s troopers in closing up to Brunswick’s rearguard in the town. As so often happens in delaying operations, nightfall brings difficult choices for the defender. Brunswick had done really well, stopping the mighty IV Corps in its tracks with heavy casualties (2300) but it was clear that Kellerman and Oudinot could have a free run to the Innerste thus cutting off any withdrawal, which would be difficult enough with Soult in his face next day. 1100 wounded and the surviving batteries were sent away with muffled wheels followed by the three divisions that headed towards Hildesheim, leaving 700 dead, and a small rearguard to keep the fires burning. Wellington faced a similar dilemma on the night of 6th June. He had a very strong position that could not be tactically outflanked at Gronau, with I, III, 1/2 IV and I Cav Corps present and V Corps approaching, so far out of contact. II Corps was covering the valley to the east - the Sibbesse Gap (of BAOR fame). Napoleon had followed-up from Alfeld but local people reported only one infantry corps (Lannes’ V) in advance of the Imperial Guard and a lot of impressive cavalry (Murat and Bessieres). Should he attack on the 7th? Where were the other French corps, especially west of the Leine? That night he heard from Brunswick that he was retiring on the unguarded town of Hildesheim with Soult, Kellerman and an unknown corps (II) on his heels. Craufurd reported camp fires two miles to his south (Ney). The audacious option was a dawn attack to defeat Napoleon and his Guard, but this was the highest risk option with complete encirclement a possibility. The ‘Gneisenau’ option was to withdraw along his L of C towards Hanover to avoid Soult and St Cyr’s closing jaws. This would leave the second city of Brunswick (Hildesheim) to the French and British honour in tatters. He chose the ‘Blucher’ option - to fall back on his allies at Hildesheim.June was at the crossing of the River Leine east of Elze, having got ahead of Lasalle and St Cyr, who, coincidentally were seeking the same crossing to gain the east bank north of Wellington. Pajol’s 11th Lt Cav Div was in contact with Chasse’s 12th Div around the town when St Cyr launched Delzons’ 15th and Foy’s 16th Divs at the rearguard. Orange assessed correctly that he had been caught, could not outmarch the French that day but might give St Cyr a bloody nose around the town. He recalled Saxe-Weimar’s 15th and d’Aubreme’s 14th Divs, giving him numerical superiority, though he was a little mystified at the appearance of some hussars between him and the bridge to the east (see Figure 5).
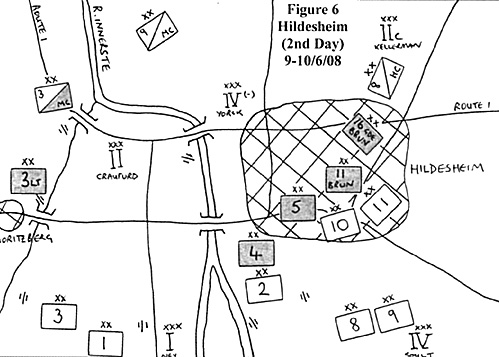
Maybe they were Brunswickers? St Cyr made some early inroads into Elze but could not clear the town. Lasalle’s cavalry got around the flanks unopposed by any Dutch cavalry but could not penetrate the Dutch squares. The mystery cavalry was French, but only of regimental strength which was chased off by Pirch’s 10th Brun Div sent by the withdrawing Wellington to keep open Orange’s link to the Leine bridge. Now it was St Cyr’s turn to be surprised. Just as he was fully committed, another Dutch div arrived in his rear. It was Perponcher’s 13th Div that had been a day behind on the march from Hameln. Their slow marching now paid dividends as panic spread amongst the French infantry, who broke away from Elze. Lasalle could only harry Orange as he marched away to join Wellington, destroying the bridge behind him. Again, the butcher’s bill favoured the Allies with 1500 casualties against 2200 - mostly in the weak VI Corps. The opening moves were now coming to a close; it was time for the main protagonists to lock horns seriously. Manoeuvres around Hildesheim (8th-11th June)The battles around Hildesheim between 9th and 11th June resemble those of Leipzig some years later; they involved most of the troops in theatre, were fought in sectors and produced, after some days, a decisive result for the campaign leading to a pursuit. Wellington’s withdrawal from Gronau had taken him to a pre-recce’d ridge position at Giesen, west of Hildesheim, covering the roads to the city and to Hanover to the north. Here he was joined by Orange’s V Corps and the newly raised VI Brunswick Corps commanded by the Duke. Napoleon became aware of this position from his scouts early on 10th June and was able to call on Lasalle and St Cyr as well as Lannes, Murat and the Guard. Urgent messages went out to Davout to abandon his wide sweep to the north and close in on Giesen - the reply said he could not arrive in force before the 11th. Further south, Soult’s march continued, bringing his divisions to the southern outskirts of Hildesheim. Ney had pressed Craufurd back along the Sibbesse valley towards Hildesheim, but without any real conviction. Thus Soult found the city garrisoned only by the survivors of Wesseln and pressed home an attack in the afternoon of 9th, seeking to capture the city and cut the main road to the capital (see Figure 6).
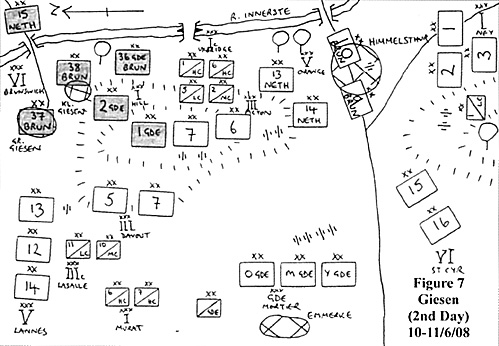
In this he was largely successful so Yorck appealed to Craufurd for help from across the Innerste. At this juncture, Wellington rode onto the field to assess the situation. He realised immediately that Yorck was about to fold and ordered Byng’s 4th Div to restore the situation while the remainder of Craufurd’s Corps was halted and turned to face Ney. Byng was particularly successful in evicting St Hilaire and Legrand from most of Hildesheim and Grant’s 3rd Med Cav Div held Ney’s cavalry at arms length, thus preventing his infantry divs from supporting Soult from the west bank. Somewhat surprisingly, Ney cooperated with Soult by detaching Compans’ 2nd Div to the east bank whilst Kellerman’s cavalry skirted around the north of the city to make further English reinforcement by Craufurd more difficult. By nightfall, Craufurd was in a good position facing Ney, but Yorck had been pushed back in the east of the city. Overnight, the French I, IV and II Cav Corps completed their concentration while Craufurd realigned behind a small stream which increased his protection but drew him away from Yorck (who still retained Byng). The damaged Brunswick artillery was recovered and repaired. The battle began again with increased ferocity on the morning of the 10th. Both sides had amassed large batteries so casualties were high among the advancing infantry of I Corps and the defenders of Moritzberg (Halkett’s 3rd Lt Div) where the flat flood plain provided little cover. Casualties were also high in the streets of Hildesheim where Yorck was pushed back by Soult’s fresh divs and St Sulpice’s cuirassiers, who attacked along the main street. As the day ground on, the French artillery gained the upper hand. Craufurd’s batteries were largely silenced and some of Yorck’s battalions began to surrender or break under the pressure. By late afternoon, a withdrawal was ordered to the north towards Wellington’s main position, but this was a painful process, particularly for those who had to cross the Innerste bridges under heavy fire. The well-known lack of cooperation between Soult and Ney returned, as Ney’s attacks were not pressed just when they could have cut off Yorck’s escape. Even so, the Brunswick 8th and 11th Divs and Byng’s 4th Div were destroyed and had it not been for selfless charges by Grant’s dragoons in the twilight, the damage could have been worse. Whilst this battle was reaching its decisive conclusion, Napoleon and Wellington crossed swords at last at Giesen. Napoleon had Wellington deployed in defensive battle array before him. The opportunity for a decisive end (combined with the Battle of Hildesheim) was nigh. There were several problems. Wellington’s concentration was complete but Napoleon lacked all of Davout’s Corps (less Morand’s 6th Div) and Ney who were supposed to be the jaws of the pincers. In fact Wellington had 12 infantry divs to his nine, including the three of the Guard. Cavalry and artillery numbers were roughly equal. Furthermore, Wellington’s position was strong, anchored on the villages of Gross and Klein Giesen in the north (held by Brunswick’s VI Corps) and Himmelsthur in the south, where 9th and 10th Divs of the split IV Corps stood. Between them ran a typically Wellingtonian ridge lined by Hill’s I and Picton’s III Corps. In reserve, hidden from view, were Orange’s V Corps and Uxbridge’s Cavalry Corps. The only weakness was that the Innerste ran to the rear, but a pontoon in the centre enhanced the bridges at the two villages (see Figure 7).
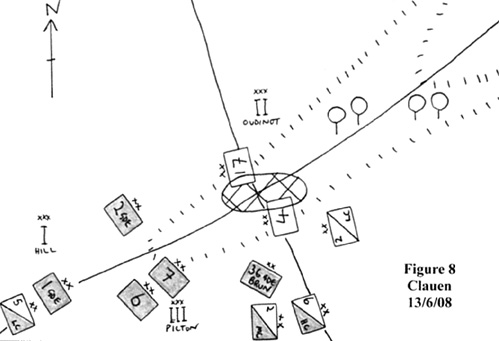
It is possible that Wellington could have seized the initiative and attacked Napoleon, but he was concerned about the events to the south in Hildesheim and was also aware that Davout had been reported to the north and an unidentified French formation was on the loose north of Hildesheim. (In fact, Oudinot had lost the Brunswick scouts after Wesseln and was in the process of cutting the Route 1 between Wellington and the capital - more of which later.) Thus the initiative lay with Napoleon, who chose to conduct pinning attacks on the 10th, whilst his outlying corps closed in for an attack on 11th. Refusing his right with St Cyr’s Corps and a Grand Battery and placing the Guard in the centre, he attacked on the left with Lannes (with Morand’s Div under command), Murat and Lasalle. Unfortunately for the Allies, Wellington was not well and unable to ride. He did not exert his usual mercurial influence at the points of crisis and Lannes and Murat succeeded in capturing the Giesens and reaching the northern bridge. Activity across the remainder of the front was very muted keeping casualties low. The Allies began their withdrawal across the river. The tactical situation at nightfall slightly favoured the French, but operationally they were in a much stronger position. Both sides now knew the results of Hildesheim and Craufurd was falling back on Himmelsthur with Ney in pursuit. Davout was closing in from the north and Soult and Oudinot were now both on the east bank, albeit out of the battle area. Surprisingly, therefore, it was the now recovered Wellington who took the ‘brave pill’ and reversed the flow. A daring night attack back across the river was ordered which achieved early success. Uxbridge led the way, catching both Murat and Lannes at bivouac, routing a number of regiments and capturing most of the two Corps’ artillery. I, III and VI Corps followed up, securing the Giesens and the important ridge. Orange and Zeithen reoccupied Himmelsthur unopposed. By 0700 hours, the Allied position was similar to that of the morning before. Despite the surprise, Napoleon was delighted to see Wellington again now that he had the majority of his army to hand. Ney was ordered to attack Himmelsthur from the south, linking with St Cyr. The remains of Lannes’ Corps was to try to regain the Giesens. These two attacks stretched Wellington and particularly Ney began to require the committal of reserves from Orange’s Corps. By mid-afternoon, Napoleon judged that the Allied line was sufficiently taut to be able to be pierced in the centre and a combined arms attack was assembled. Following a concentrated bombardment of the artillery on the ridge, Murat led his and Lasalle’s divisions over the crest and into the rear where he was countered by Uxbridge. However, the attack allowed Davout and the Guard to reach the crest unopposed. After a fierce struggle between the two Guards, the French gained ground, pushing them down hill. At this point, Uxbridge was overwhelmed and Ney broke Orange’s resistance seizing the Himmelsthur bridge. Two more hours of daylight would have seen the destruction of the Allies against the river, but darkness neutralised the French cavalry and a reasonably ordered retreat was conducted across the pontoons. Giesen was a significant French victory with Allied casualties of 6800 against 4900 French over two days. It brought to a close the operations around Hildesheim and heralded a pursuit phase. The Pursuit to the East and the Dénouement - (12th-22nd June)The Allies had been badly defeated but were not routed. Having made the east bank of the River Leine without serious interference from the almost equally tired French, Wellington set in place an organised withdrawal, initially to the line of the River Fuhse where he hoped to stand, but subsequently to the capital, Brunswick, on the River Oker. He resisted the temptation to take his British troops away to the north back in to Hanover as he felt that the French were weakened and could yet be defeated and he also did not want Napoleon following him into British held-territory! He chose three routes, with I, III and I Cav Corps in the north, V and VI Corps in the centre and II, IV and II Cav in the south. The heavy casualties over the past few days caused a simplification of the ORBAT, which was gradually achieved as staff officers were able to find and direct the affected divisions. (Craufurd was already reduced to two divisions, as Byng’s 4th had not survived the Battle of Hildesheim. The much-split IV Corps was re-assembled, taking on the survivors of the 8th Div from Picton’s Corps and Bulow’s 11th Div to bulk out 9th, 10th and 16th Guards Divs. Its cavalry, along with that of VI Corps, was incorporated into II Cav Corps and Chasse’s 12th Div was spread around the Dutch Corps. By contrast, Napoleon continued with under-strength divisions, though St Cyr’s Corps’ days was numbered. Those of you following the campaign closely will be wondering where Oudinot’s II Corps was. He had moved north from Hildesheim, to cut the communications with Brunswick. He chose to site himself at Clauen on the Peine road, which was Wellington’s northern route, and unfortunately for Oudinot, being used by the most capable force. Wellington realised that Oudinot was isolated and could be masked and bypassed, but felt that he had the opportunity for a morale-boosting victory if he acted quickly. This he did. Uxbridge flowed around the southern flank, despatching L’Heritier’s light cavalry. Hill’s Guards attacked along the road, while Picton’s weakened Divs struck the village from the south. With only two infantry divisions (Vandamme’s 4th and Suchet’s 17th), Oudinot could do little but cling on around the village and hope for relief (see Figure 8).
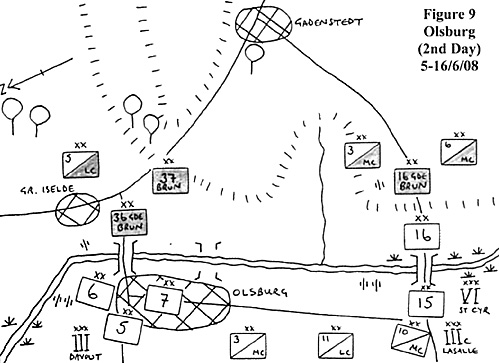
The quality of the British infantry was too good; the corps artillery was stormed, the village taken and Oudinot brushed away to the north as Lasalle’s cavalry began to arrive. Wellington marched on. Napoleon had placed his main effort (I, IV, V, Gde, I Cav and II Cav) on the most direct southern route (Route 1) and those great pals Murat and Ney caught up with Yorck and Craufurd as they were crossing the River Fuhse at Steinbruck on 15th June. The British were already across and preparing the bridge for demolition, but the Brunswickers were slowed in contact by the bridge over a tributary to the west, the Krummbach. Von Lutzow’s cavalry had initial success against Murat, until St Sulpice’s heavies outflanked them, forcing Zeithen and Pirch into squares. At this stage the Krummbach assisted the Allies as Ney’s infantry was held up sufficiently to allow Yorck to get his infantry across the Fuhse. Heavy artillery fire and a charge by the carabiniers could have broken the Allied resolve, but fortune was with them and the demolition job succeeded at the first attempt, creating breathing space. However, events to the north precluded a co-ordinated Allied defence on the river. The northern and central routes converged at Olsburg, where there were three bridges across the Fuhse. Brunswick’s composite force was left to blow the bridges and cause maximum delay on the French. Vivian and Gruber’s cavalry were in serious contact with Lasalle from mid-afternoon, particularly in the south where St Cyr’s VI Corps backed up the cavalry. Time was bought to allow the engineers to ready the demolition, but the charges failed and Foy’s 16th Div gained a foothold as night fell (see Figure 9).
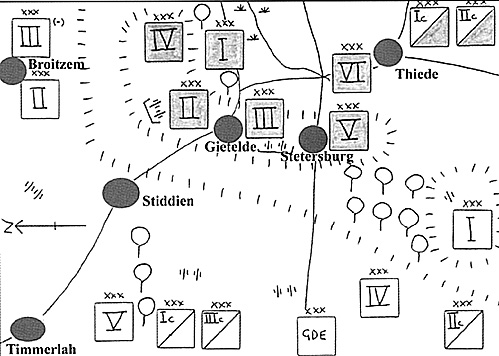
Langeron’s Brunswick Guards attacked several times in the dark, but could not dislodge the French. The central bridge was successfully blown overnight, but the northern one stubbornly refused to fall. By dawn, Davout’s Corps was attacking the northern bridge and Brunswick was losing his temper with his Sappers. Thanks to heroic resistance from his Guards, another attempt was made possible, and this time the arches fell, but the rubble was still passable to infantry. St Cyr had been well contained to the south and was under real pressure by mid morning on 16th, until reinforced by Davout’s cavalry and the first of Lannes’ divisions (Delaborde’s 12th). St Cyr was gravely wounded while rallying his tired divisions. Brunswick was able to break clean after the loss of St Cyr and the breaking of the northern bridge. These rearguard actions had given Wellington some time, during which he selected another typical site for a defensive battle, to the south of the capital, Brunswick. With the agreement of the Duke, it was accepted that the capital would not be defended, but a defeat of Napoleon further along the River Oker should force his withdrawal and save the city. On an L-shaped ridge, including the villages of Stetersberg and Geitelde, Wellington drew up his six infantry and two cavalry corps and reinforced the position with entrenchments. The ridge gave perfect protection to his reserves and allowed observation of movement to be denied to the French. He also secured the bridges across the Oker, some miles to the east. Leaving the Young Guard to garrison Hildesheim, Napoleon pushed east on a broad front. In the north, Davout and Oudinot found the capital defended lightly by the Landwehr, but left the siege to Gudin’s Div and the corps’ cavalry when called south by Napoleon. On the southern flank, Ney attempted to seize crossings over the Oker, but was fended off by Uxbridge. On receiving his call to battle, he left Dessaix’s Div to continue the outflanking movement and marched north, screened by Uxbridge. The stage was set for the final, monumental battle of the campaign on 22 June. The ground and Wellington’s deployment largely negated Napoleon’s main advantage - cavalry. Napoleon had 17 infantry divisions (2 Guard) to Wellington’s 15 (4 Guard), though 6 of these were only brigade strength. Artillery was matched, but Napoleon had twice as much cavalry. Wellington’s line was held by Yorck on the right facing north. Craufurd held the angle of the ridge with an emplacement at his centre. South of him, Picton had strongpoints of Geitelde and another earthwork and Orange was on the southern end in the village of Stetersberg. Uxbridge and Roder’s cavalry covered the left flank where the ground was more open, though a large wood separated the two armies here. Hill and Brunswick were the northern and southern reserves. Napoleon planned to stretch the Allied line with Davout and Oudinot descending on the north of the ridge and Ney and Kellerman closing in from the south. Soult was held to strike the line around Stetersberg, with Lannes, Murat, Lasalle and the Guard as the masse de decision (see Figure 10).
The attack began in the north where Davout and Oudinot broke Yorck’s Corps and gained the ridge. By stretching to the north, Craufurd was able to hold them in the wood on the reverse slope. Unusually for him, Lannes was slow in attacking, giving time for Hill to plug the gap on the angle. The Guards threw Oudinot and Lannes back down the hill but Davout was still in place and Murat saw the opportunity to charge the gap developing between Hill and Picton. Things were going marginally better for the Allies in the south. The Allied cavalry had great success in wrapping up Ney’s efforts to advance beyond the wood. Soult’s powerful Corps was being held by Orange in Stetersberg, but only with the help of Brunswick’s reserve Corps. By 1300 hours, Napoleon had ordered the Guard to prepare to attack when an audacious charge by the Allied cavalry halted preparations. It took the whole of the French cavalry (less Murat) to halt this attack and these two large cavalry bodies occupied each other for the next three hours. It was a grand stroke, but not decisive enough to stop the French infantry. In fact, it allowed Ney to gain some headway against the south of the ridge, but too late to help Soult who had to withdraw after gaining and losing most of Stetersberg three times. However, as Napoleon had predicted, the decision occurred in the centre. Murat had continued to disorganise the Allied right centre allowing Davout to hold and Oudinot and Lannes to regain the crest and forcing Picton to orientate north. At 1700 hours, the Guard struck to the south of Lannes taking Picton in the flank without facing the searing British musketry that had repulsed Lannes earlier. The northern Allied corps were finished as a fighting force and began to withdraw. Those in the south had an easier task of disengaging. Casualties reflected the heavy fighting: 7800 French and 11100 Allied. Both forces were exhausted so the Allied retreat was uncontested, as was the French occupation of Brunswick two days later. The Duke of Brunswick rapidly made peace with Napoleon and Wellington took his British troops back to Hanover. SummaryThe campaign had lasted three weeks, during which time Napoleon had achieved complete success, but at considerable human cost. It had been closer than the final outcome suggested. The Allies had fought well at the tactical level, apart from the first day at Giesen. Wellington had chosen excellent positions at Giesen and Brunswick yet had been unable to stop the French. On both occasions the faster marching of the French allowed Davout from the north and Ney from the south to stretch the centre sufficiently for it to be pierced, but only by the committal of the Guard. Given the reasonable parity of numbers, perhaps Wellington could have been more aggressive, particularly when he had gathered all his corps between Gronau and Hildesheim while Napoleon’s wings were much further spread, and then again on the first day at Giesen when he had numerical advantage. In the months following the defeat, these thoughts pervaded the Allies who realised that they had given Napoleon a near run thing, without the involvement of Prussia, Russia or Austria. These bystanders had noted Napoleon’s apparent failings and would feel hard enough to come and have a go before too long. Could Napoleon succeed on two fronts in Central Europe? Back to Table of Contents -- First Empire #57 Back to First Empire List of Issues Back to MagWeb Master Magazine List © Copyright 2001 by First Empire. This article appears in MagWeb (Magazine Web) on the Internet World Wide Web. Other military history articles and gaming articles are available at http://www.magweb.com |