THE BATTLE
As the head of the Danish column approached the village of Holzsee an enemy force could be seen occupying it. Lallemand's Advanced Guard deployed into battle formation and the long convoy halted to allow them to clear the enemy from the village. However, Major Baumberg, commanding the force holding Holzsee, had no intention of taking on an entire corps with only three battalions so he slowly withdrew to a position to the north of the Habye Marsh, facing southeast. Frederik dispatched the two battalions of the Holstein Regiment, the battalion of the Queen's Regiment and a hussar squadron to keep an eye on him. At the same time he also sent two squadrons of the Holstein Cavalry Regiment and the Poles to cover the area to the north and east of Holzsee.
Baumberg's slow withdrawal had given time for Walmoden to bring up the rest of his troops from Sehested but, as the Danish march continued, he allowed himself to be pushed back towards that village. As the Danes passed the southern end of the causeway leading through the marsh a detachment under Major Berger was left to prevent Baumberg from descending on the rear of the convoy. This was just in time as, within a few minutes, Baumberg's force attempted to storm the causeway. The task was virtually impossible as they could only form up in a column eight men wide and the attack was beaten off with such heavy losses that Baumberg was effectively out of the action. The units left to keep an eye on him north of the marsh were now joined by the four squadrons of cavalry from Holzsee and, as a consequence of this disastrous attack, these units were free to begin moving towards the Sehested road and the rear of the convoy.
Walmoden had now reached Sehested where he turned to face the Danes, forming up at the north end of the long, straggling village, just south of the point where the Rendsborg road takes a sharp right turn, with his left just to the north of the marsh which runs along the western side of the village and his right on the river Eider. The Mecklenburg Jaeger battalion was sent across the river in the direction of Holzsee to see if it could harass the convoy with long range musketry. Seeing their enemy taking up this position the Danes once again halted and prepared for battle. The 1st and 4th battalions of the Oldenburg Regiment formed column and, supported by the fire of Gonner's and Koye's batteries, assaulted the village, screened by a musketeer company of the 1st battalion and the Jaeger company of the 4th.
The 6th and 7th battalions of the Russo-German Legion were bundled out of the houses north of the church but immediately counter attacked and, supported by the 5th battalion, threw the Danes back to their original position. Frederik now decided to launch a better prepared attack and ordered the light battalions of the advanced guard into skirmish order and they, supported by the 1st battalion of the Jutland Regiment formed in line, and followed up by Schulenberg's brigade, were instructed to renew the attack.
The attack went in with Frederik himself at its head and completely cleared the village of Allied troops. The victorious Danes formed line along the southern edge of the village and a detachment under Major Bie, consisting of the 1st battalion of the Funen Infantry Regiment and the Friis battery, was sent to cover the ground between Sehested and Hohenfelde, across which the Allied left wing had retreated. Walmoden now ordered the village to be retaken and the 5th and 6th battalions of the Legion, along with the Anhalt-Dessau battalion, supported by the guns of the KGL and the Hanoverian battery, returned to the fray, attacking in battalion columns.
The leading column, that of the 5th battalion of the Legion, was charged by the Funen Dragoon Regiment and, despite a gallant attempt, was unable to form square in time and was ridden down. The survivors were taken prisoner as were the crews of the two KGL guns and one Hanoverian gun. The other two battalions broke and routed back to their own lines whilst the captured artillery pieces were dragged back into the Danish lines. The Allies now withdrew some 500 metres down the Osterrode road and took up a new position with their left resting on Hohenfelde and their right on the Eider. On their left a fierce firefight had developed between the 1st and 2nd battalions of the Russo-German Legion and Bie's force, the outnumbered Danes getting the worst of it. Now, his men having run out of ammunition, Bie was forced back about halfway to the Rendsborg road, along which the convoy was now passing. Fortunately for the Danes, the units that had been observing Baumbach's troops north of the Habye Marsh now arrived and pushed the Allied left wing back to its main body.
In a desperate attempt to break the Danish line Walmoden ordered the Mecklenburg Mounted Jaegers to charge the enemy on the southern edge of Sehested. They were received by well controlled volleys from the 2nd battalion of the Funen Regiment and the 1st battalion of the Schleswig Regiment and were destroyed as a useful fighting force.
Realising that he could no longer hope to hold his position Walmoden ordered a retreat over the Eider to a position on the low heights around Osterrode. Frederik ordered the Holstein Cavalry Regiment forward to try and convert this retreat into a rout but their attack was beaten off by overwhelming firepower and they fell back to the north bank.
The Danes took up a position on the north bank of the Eider and began an artillery bombardment of Walmoden's position as well as keeping a wary eye on the rest of Vegesack's division, which had just arrived and was now occupying a position between Wakendorf and Bovenau to the west of the canal. Under heavy bombardment, Walmoden now began to withdraw across the Cluvensieck bridge, taking up a defensive position facing back across the canal.
Bernadotte had now arrived on the scene and, after a short discussion with Walmoden and Vegesack, sent a messenger to Frederik suggesting a twenty four hour cease-fire in order to collect the wounded and bury the dead. The Danish convoy was now moving down the Rendsborg road so Frederik agreed. The Danish troops marched after the convoy, a rear guard being left on the Muhlen Berg to prevent any attempt at a pursuit. So ended the battle of Sehested. The Danes had achieved their objective of clearing the road for their convoy whilst the Allies had received a severe drubbing.
CASUALTIES
The Danish casualties are tabulated below:
| Casualty | Officers | Men |
|---|---|---|
| DEAD | -- | 56 |
| WOUNDED | 14 | 222 |
| WOUNDED PRISONERS | 1 | 13 |
| UNWOUNDED PRISONERS | 2 | 15 |
| TOTAL | 17 | 306 |
Walmoden's casualties were not recorded but the Danes estimated them as being at least three times their own in addition to 24 officers and 600 other ranks taken prisoner.
AFTERMATH
Frederik's little army reached Rendsborg without further incident and prepared to defend it against all comers. The King, however, realising that his cause was lost, now sought peace and a treaty was signed with the Allies in January 1814. As a reward for its contribution to the Allied war effort and as a punishment for Denmark siding with France, Sweden received the long sought after territory of Norway.
BIBLIOGRAPHY
von Quistorp, Geschichte der Nord Armee Generallieutenant im Jahre 1813. Barthold. Berlin 1894.
Johansen, Jens. Frederik VI's Haer 1784-1814 Copenhagen 1948.
Liebe, Poul Ib. Napoleon's Danske Hjaaelpetropper-Auxiliaerkorpset 1813. Sorgenfri 1968.
Regler for Infanteriet Naar Samme Skal Faegte Spredt. Copenhagen 1807.
I would also like to express my thanks to the office of the Danish Military Attache in London for their help in assembling some of the material used in this article.
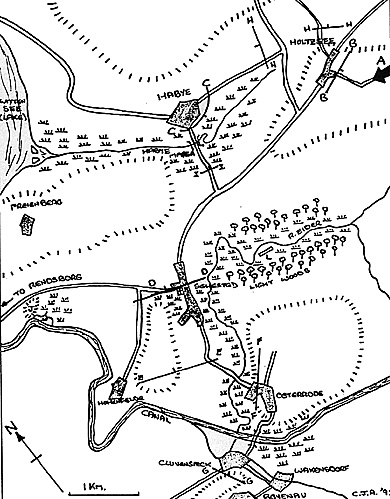
Map Key
A: Danish Entry
B-B: Baumberg's 1st position
C-C: Baumberg's 2nd position
D-D: Walmoden's 1st position
E-E: Walmoden's 2nd position
F-F: Walmoden's 3rd position
G-G: Walmoden's final position
H-H: Danes and Poles Observing Baumberg
I-I: Berger's position
J: Muhlen Berg
K: Church
L: Mecklenburg Jaegers
The Battle of Sehested Introduction
Back to Table of Contents -- First Empire #5
Back to First Empire List of Issues
Back to MagWeb Master Magazine List
© Copyright 1992 by First Empire.
This article appears in MagWeb (Magazine Web) on the Internet World Wide Web. Other military history articles and gaming articles are available at http://www.magweb.com