The Refight
Your enlightened writer undertook the daunting role of the Americans whilst one of his regular Bassett Group (and Head Tormentor) Kevin "Boy Napoleon" Morgan swapped his greatcoat for a redcoat just this once. What you will read is an entirely biased account from the American viewpoint which I hope will leave you awake enough to put pen to paper in order to criticise the generalship and postulate your own tactics. I also know that our beloved Editor would be grateful of any future battle reports on this or any other scenario which you might stumble upon within these hallowed pages.
Having been given little or no options in set up thanks to Mr Secretary Monroe I sat back and waited as per the dispositions on map 1. I had a theory as to who would be leading the way and I was not disappointed. Knowing my opponent's veneration of black troops the West Indian Marines boldly marched onto the table cautiously followed by the 85th Light Infantry and the detached light companies. Obviously seeing little in the way of movement the West Indians crossed the bridge (in column, obviously) and before they could change formation received a truly astounding round of canister from the entrenched Baltimore Artillery.
This rather unsporting opening resulted in the entire unit being either killed or mortally upset and promptly routing off table to glorious cheers from Yours Truly. In doing so they seriously upset the obviously touchy Colonel Thornton who ordered the light companies to retreat whilst the 85th took refuge in the Mill from whence they refused to come for the remainder of the action.
This departure so upset General Ross that he rode down the turnpike after the remnants of his Light Brigade and became totally detached from the action. I must confess at this point that I thought the battle all but over and was just about to congratulate Mr Secretary Monroe on his inspired modifications when the Second British brigade marched on table.
Never mind, thought I, we'll give them the same treatment with the volunteer rifles assisting for good measure. This confidence was further increased when the Third Brigade took a reaction test as the West Indians streamed past them and promptly halted at the roadside. How I could possibly know about such distant matters can either be put down to darned fine American scouting or a profusion of Bourbon as a teenager.
This, as it turned out was the high point for me. Whilst the 44th Foot slowly made their way to the hedgerow alongside the Mill the 1/4th not only casually took my first round of canister (which was rather pathetic - I dropped 12 men) in their stride, but then formed line and proceeded to silence one of my guns with an all too impressive opening volley. At this point I began to get a bit worried and decide to move up the right flank militia unit (1st Baltimore) from the second line in support.
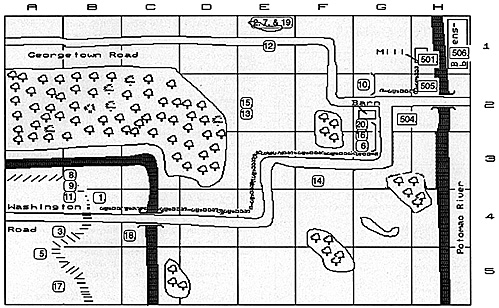
The Washington Irish Battery also began shelling the Mill, or at least tried to, as they seemed unable to get the range. Luckily I was not faced with any serious artillery opposition as the R.A. Battery had moved into Bladensburg to seek shelter and had gotten mired down in the sidestreets of the town, whilst the dreaded rockets had pulled up off table due to the 3rd Brigade's reaction test. This was thus the situation at 1300 hours (see map 2).
To my dismay at 1310 hours the 1/4th charged the guns who routed immediately despite their entrenched position. The situation was compounded as I had advanced the James City County Light Infantry from the safety of the right end of the fieldworks with the intention of taking the 1/4th in the flank. This was not to be as the Third Brigade took this moment (1320 hours) to arrive on table and they erupted over the bridge at the double to threaten the James Boys.
My lads put a meaningless shot into the column and were astounded when it returned fire killing 15 men. Losing 15% of the unit in one moment was patently too much for the James Boys who fled to the safety of the woods and from there, I imagine, home. Worse still, the Baltimore Rifles refused to charge the 1/4th as they stormed the fieldworks and they too ran instead, thanks to a volley which left 57 men on the ground. I was not chuffed. Meanwhile the Combined DC Riflemen were trading long range fire with the 44th, to no real effect.
At 1330 hours as I tried to rally what was left of my front line, the Baltimore Rifles saw a rocket fly overhead and promptly followed it towards the hills, never to return. I decided that a determined push would finish off the British who must be getting tired, so I doubled the Regulars and the USMC from the third line along with the Maryland Militia and the DC Militia Artillery. The sight of this forced the 1/4th to take shelter in the Barn and they looked even more upset as Commodore Barney's Seamen arrived on table waving cutlasses and shouting abuse at anyone prepared to listen. With my artillery superiority I now once more felt confident.
Crucial Moment
The crucial moment of the battle came at 1350 hours when the American Regulars and marines advanced towards the Barn to be met by the 1/21st Fusiliers, still in the column which had seen off the James Boys. This column then spread out into the more familiar two-deep line and awaited my advance. Knowing my inferiority in firepower I decided to risk all by committing both units to attack the fusiliers whilst on the opposite side of the Barn the same thought occurred to the British as the 44th advanced from the hedgerow to attack the Combined DC riflemen.
As both my regular units charged the Fusiliers unleashed a splendid volley which killed about a third of each unit. Needless to say both units were upset and when support fire from the 1/4th in the barn raked their flank the Marines routed, shortly followed by the Regulars. On the far side of the Barn I was depressed further by the sight of the DC Rifles abandoning the fieldworks before the British had come into contact. Thus two hours after the battle had started the British, without their best troops and their commander had finally cleared the American first line.
The sight of the Regulars and Marines routing also upset the 1st Baltimore Militia and they too headed back for the comfort of the woods. Luckily on the right flank I still had the guns of Barney's Seamen and the DC Militia Artillery coming up the road and this was enough to make the British pause. On the other flank however, the 44th Foot had now been joined by the Royal Marines who had force marched up the road and they looked threatening enough to the inept Washington Irish Battery to cause them to abandon their guns and flee up the road towards Georgetown. A last ditch charge by all three cavalry units failed to even worry the British who casually stayed in line as all three refused to charge and decided to cover the retreat instead!
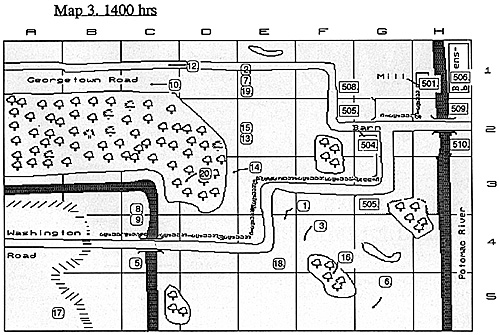
It was at this point that we considered the battle over. On the British left they had cleared the Georgetown road and were quite capable of marching up it unhindered. However, on the other flank the Fusiliers and the tired 1/4th were in no real position to take on two fresh batteries, one of them 12pdrs. Thus we decided to call the battle a draw, as I was incapable of doing anything other than defend with the artillery supported by militia. Thus the situation at 1400 hours can be seen on map 3.
Casualties were totalled up and we were surprised to find that after all that fighting casualties were incredibly close with the Americans losing 556 men (8% of their force) and the British losing 559 men (14% of their strength). Thus it is fair to say that in our reenactment I successfully saved the Whitehouse from being bunt whilst Major General Ross had some serious explaining to do when he returned to see Admiral Cockburn.
Gaming Notes
The rules used for this fight were the Editor's own Follow The Eagle 5 on a PC compatible computer. You could equally well use other available computer sets such as Carnage and Glory, Hard Pounding or Sota's old Napoleonic rules (for the Spectrum). You could even be really antiquated and use a written set with some dice, but I wouldn't recommend it.
The equipment and troop types are self explanatory and are taken directly from the Order of Battle facility in the game program. It was decided to make the American militia D class rather than E for a good game, and as it turned out it worked fine, with most of them firing happily enough at long range, but not liking a taste of the bayonet. Those troops rated higher are either regulars or volunteer units with a better reputation.
As far as terrain is concerned the battle was designed to fit my own 8' by 5' table using scenic terrain blocks. It is reproduced as such specifically to enable you to do the same. All woods are open , the gullies allow troops to hide in them unseen and the East Branch of the Potomac is unfordable, whilst the other stream is easily fordable, if you get that far. The hill is gently sloped.
The computer rates commanders for ability and troop loyalty, and these are the two numbers shown after their names on the Order of Battle. Generally unless you know something specific about how the troops feel about their boss then I recommend a middle-of-the-road Fair (3) rating for safety's sake. The ratings go from (1) - Excellent to (5) - Despicable.
The scenario has been created specifically as a wargame and not as a direct historical representation, hence some of the smaller units have been combined or left out, and the terrain is styled for a table. I have no love for terrain maps which may look very nice on paper but which require several thousand pounds-worth of Geo Hex terrain to recreate. If any of you have criticisms of this style please feel free to voice them ,but consider how user-friendly your evaluations are.
Figures used were obvious for the British, but require more thought for the Americans. I fielded Napoleonic French for the Regulars and the USMC, ACW Confederates for the militia and Napoleonic Prussians for the artillery, apart from the Seamen who were also Rebs.
Figure scale was one figure to 50 men and one artillery model to three guns. The ground scale is 1mm/1 yard.
The Historical Outcome
Well, we burnt the Whitehouse, didn't we. The Americans inflicted 250 casualties on the British, losing about 80 men themselves, but their spirit was completely broken. Not far from what happened on-table but the casualties were closer and the British had not penetrated to the American reserves.
Conclusions
Firstly it struck me as being a bit rash for Boy Napoleon to lead off with his West Indians, treasured though they may be. Their small numbers and relatively ordinary morale made them ripe for routing, although their effect on the rest of the Light Brigade and on Ross himself could not have been predicted. That the British fought back for a draw shows the capacity of British troops. I did not feel that Kevin made any other mistakes other than bogging down the artillery in Bladensburg (in our local amendments artillery in built up areas moves very slowly) which certainly let me off the hook.
As for me, what mistakes did I make? None that I can think of, actually. What do you think?
Bibliography
The War of 1812, J. Mahon.
When We Burned The White House, Andrew Tully.
The Napoleonic Sourcebook, P. Haythornthwaite.
Osprey Men-at-Arms 226
The American War 1812-1814, P. Katcher.
The Battle of Bladensburg (Wargames Illustrated 28), A. Harman.
Back to Table of Contents -- First Empire #5
Back to First Empire List of Issues
Back to MagWeb Master Magazine List
© Copyright 1992 by First Empire.
This article appears in MagWeb (Magazine Web) on the Internet World Wide Web. Other military history articles and gaming articles are available at http://www.magweb.com