
A Brief Summary of the Campaign
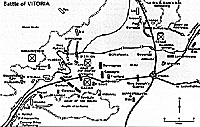 The map is taken from David Chandler's Dictionary of the Napoleonic Wars published by Greenhill Books, Lionel Leventhal Ltd, 1993. This book is a vital source of information and maps for anyone interested in the Napoleonic wars.
The commonly accepted image of Wellington is as a defensive commander, brilliant at the art of the dogged defense, letting the enemy batter himself into a bloody mess against solid walls of British infantry. However in 1813 Wellington conducted a campagn that was both offensive strategically and tactically. The campaign that led to the battle of Vitoria and the tactics of encircling manoeuvres that he employed during the battle are eloquent rebuttals of any charges that Wellington and his army were no good at attack. It may have taken several years of intense on the job training in the university of hard knocks but by 1813 the army that Wellington commanded was more than able to outmanoeuvre the French.
The army that Wellington commanded had received significant reinforcements for the 1813 campagn. This was despite Britain having to defend Canada against an American invasion in the War of 1812 and send a diversionary force to the eastern coast of Spain. Over the winter of 1812/13 Wellington trained his army hard so that it would be at peak performance. Wellington had also accepted the post of Commander in Chief of all Spanish forces, whilst still encouraging the guerrillas in their own war against the French. Communications between Napoleon and his commanders in Spain were at best difficult and at times almost impossible. The French were also paying the price of Napoleon's strategic over stretch; the disastrous campaign in Russia had drawn off troops largely to their destruction.
Losses
The enormous losses inflicted upon French forces meant that more experienced troops would have to be recalled from Spain to bolster the French armies fighting in Germany. The troops withdrawn were replaced to a large extent but with inexperienced conscripts who although they generally performed well could not match the veterans. Effectively the French had been forced to abandon Spain south of the Tagus.
Large Map of Spain (slow: 119K)
Wellington was able to concentrate his forces for an offensive on the Ciudad Rodrigo, Burgos, San Sebastion axis. The capture of the northern port of San Sebastion would enable Wellington to replace his long supply lines from Lisbon, reducing both the sea route from Britain and the overland marches to his army. This would enable him to posse a direct threat of invasion into southern France. On the 20th May Wellington set out from Ciudad Rodrigo with a force of over 81,000 men. By a series of rapid marches he manoeuvre the French under King Joseph and Marshal Jourdan into abandoning first Madrid, then Burgos, which had caused so many problems in 1812. Wellington was determined to catch Joseph before he could join with General Clausel's forces which were in the Pamplona area. The country between Burgos and Vitoria is mountainous, hard to march through especially with cannon and affords plenty of opportunities for defensive stands. By 21st June 1813 Joseph and Jordan decided to made their stand on the river Zadorra near the town of Vitoria.
The French, consisting of some 66,000 men [1], had been positioned by Joseph and when Jourdan, who was not a well man, came up to see the dispositions his heart must have sunk. If Wellington attacked head on from the west then the French were poised to push him back with heavy losses. The hills and mountains to the north of the river were thought sufficient protection for the French right flank. However Wellington did not co-operate with the French plans. He planned to march a force over those hills and launch an outflanking attack across the river from the north. The French forces would be exposed and cut off from their natural line of retreat north east along the main road. A disaster would ensue, which is just what Wellington planned for.
Four Columns
Wellington divided his army into four main columns;
Hill, who advanced from the south west pushing back Gazin's forces.
Wellington himself, who crossed the River Zadorra behind the Iruna Hill in the loop of the river, his forces then attacked the front of D'Erlon's position.
Dalhousie and Picton, who marched across the hills to the north of the river and then thrust south to cross the river and take the D'Erlon on the flank
Meanwhile Graham would marched further east over the hills north of the river and descend across the river north and east of Vitoria. His objective was to cut the French main line of retreat along the main road north east of Vitoria. Joseph's command post was on the Knoll of Arinez, where I stood to take the panorama photographs.
Related
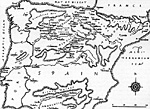
Jumbo Map of Spain (very slow: 174K)
Back to Table of Contents -- First Empire #39
Back to First Empire List of Issues
Back to MagWeb Master Magazine List
© Copyright 1998 by First Empire.
This article appears in MagWeb (Magazine Web) on the Internet World Wide Web. Other military history articles and gaming articles are available at http://www.magweb.com