 Napoleon's Battles are Avalon Hill's rules for miniature
large scale battles. This article assumes that the reader is familiar
with the rules, and it presents a scenario which the writer and his
friends have found very enjoyable. The scenario works well with
two players per side, although it is manageable with less. Time-
wise, allow six hours from the time play starts. Therefore: this is
an all day or tow evening game.
Napoleon's Battles are Avalon Hill's rules for miniature
large scale battles. This article assumes that the reader is familiar
with the rules, and it presents a scenario which the writer and his
friends have found very enjoyable. The scenario works well with
two players per side, although it is manageable with less. Time-
wise, allow six hours from the time play starts. Therefore: this is
an all day or tow evening game.
The scenario information is presented in the same format as the scenario booklet of Napoleon's Battles. A number of special rules are recommended. Save as provided in the special rules you would normally use. Since there are nine scenarios in the standard game, I have numbered this scenario 10.
10.0 "The Battle of Albuera, 16th May 1811"
On hearing that a British Army under General Beresford was besieging the fortress of Badajoz on the Spanish/Portuguese border, the French Marshal Soult collected together a relieving force from elements of the army occupying Andalusia. Beresford heard of the approach of Soult's army and took up a defensive position at Albuera. The Spanish Army of Estremedura under General Blake, unknown to Soult, had linked up with Beresford's force.
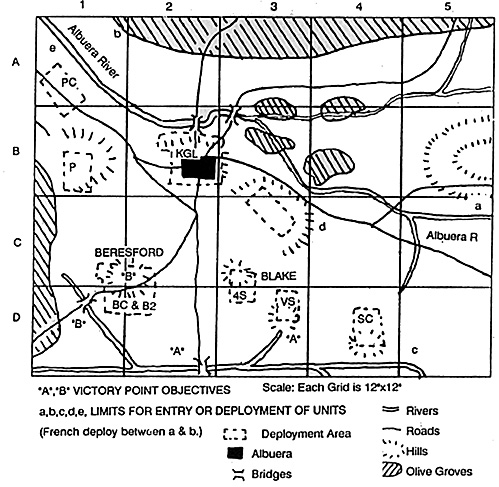
10.1 MAP. The Albuera Battlefield
MAP NOTES
10.1.1 The building of Albuera village is unfortified and has a +2 Combat Modifier.
10.1.2 Cavalry and Artillery treat slopes and olive groves as rough ground for movement purposes, unless they are on a road in limbered/column/march column formation.
10.1.3 The Albuera river, north of the fork in C3 is swift flowing between steep banks, and is only fordable with difficulty as per special rule 10.4.3.
10.1.4 SET UP
10.1.4.1. The French secretly note in writing the square of entry, the turn of entry and, where more than one unit is entering the same square on the same turn, the order in which units will enter the map. French units may be held off the map for as long as the French player wishes, but the turn and sequence of entry may not be changed after the start of the game. French units may enter on any turn east of point "A" on the south map edge or south of point "B" on the east map edge. They may enter in any desired formation.
10.1.4.2 After the French have written down their entry sequence, the Allied player sets up his initial forces (Le. everything except the British 4th Division). He may physically deploy the units on the map or, if he prefers, he can use hidden initial placement as per the advanced Napoleon's Battles rules, making sure that the location, formation and facing of each unit and the location of each officer are accurately recorded.
The Allied player has three options in the deployment of his forces:
a) HISTORICAL DEPLOYMENT: The units are set up as shown on the map. Each division's historical deployment area is shown. Individual units can be set up in any facing or formation within the appropriate deployment area.
b) TRANSPOSED HISTORICAL DEPLOYMENT: As above except that divisions may "swap" deployment areas e.g. The Spanish 3rd Division could deploy in Albuera village instead of the KG.L. Due to the limited command ranges of Beresford and Blake, the Allied player may wish to deploy each of his armies compactly, i.e., without mingling divisions of each army. However, he is free to do so if he wishes.
C) FREE SET UP. (recommended, particularly with hidden initial placement)
10.2 Albuera Orders of Battle
ALLIES: BRITISH ARMY
(2) Beresford : 9" E(7) + 1 [517/7M]
(1) British Cavalry (BC) : Lumley: 3"G(7)+1
1/BC:12 Br[4D]
2/13C 6pdr RHA
(1) Portuguese Cavalry(PC) : Otway: 3"A(5)+0
1/PC: 12 Pt.LC [6D]
(1) British 2nd Division (132): Stewart: 3"A(4)+O
1/132: 16 Br.Ln [6D]
2/132: 16 Br.Ln [6D]
3/132: 16 Br.Ln [6D]
(1) British 4th Division (134): Cole:4"G(8)+l
1/134: 16 Br.Ln [6D]
2/134: 20 Pt.Ln [10D]
3/134: 6pdr RHA
(1) Portuguese Division (P) : Hamilton: 3"A(6)+0
1/P: 20 Pt.Ln [10D]
2/P : 20 Pt.Ln [10D]
Independent Brigade: (K.G.L.) : 20 K.G.L. Ln [8D]
SPANISH ARMY OF ESTREMEMADURA
(2): Blake: 7"G(6)+1(D) [4F/5M]
N.B. If there are two Allied players, and one of them commands the Spanish Army, Blake's Initiative Rating is (10), not (6).
(1) Spanish Cavalry(SC) : Loy: 3"G(6)+l
1/SC: 20 Sp.H.C.[12D]
(1) Spanish Vanguard(VS) : Lardizabal:
4"G(6)+l
1/VS: 20 Sp.Ln.[14D]
2/VS : 6pdr Sp.F.A-
(1) 3rd Division(3S) : Ballesteros : 3"P(4)+0
1/3S : 16 Sp.Ln. [11D]
2/3S: 16 Sp.Ln. [11D]
(1) 4th Division(4S) : Zayas: 4"G(7)+1
1/4S: 20 Sp.Ln.[14D]
2/4S: 16 Sp.Ln.[11D]
3/4S : 16 Sp.Gd.[8D]
FRENCH ARMY OF ANDALUSIA
(2) Soult: 10"G(6)+1D [5F/8M]
(2) Cavalry Corps :
Latour Maubourg: 6"G(6)+1D [2F]
(1) 1st Cavalry Division(1C)
Bouvier d'Eclats : 3"G(6)+l
1/1C : 12 Fr.Lc. [6D]
2/1C: 12 Fr.Lc. [6D]
(1) 2nd Cavalry Division(2C) Bron 3"A(6) +0
1/2C: 12 Fr.Lc. [6D]
2/2C: 12 Fr.Lc. [6D]
3/2C: 6pdr H.A.
INFANTRY:
(1) 1st Division, 5th Corps (1/V) Girard : 3"G(7)+1
1/1/V 20 Fr.Ln.[10D]
2/1/V: 16 Fr.Ln.[8D]
(1) 2nd Division, 5th Corps (2/V) Gazan: 4"E(7)+1
1/2/V: 20 Fr.Ln. [10D]
2/2/V: 16 Fr.Ln.[10D]
3/2/V: 6pdr H.A.
(1)Werle'sDivision(We): Werle:4"E(6)+1
1/We: 24 Fr.Ln. [12D]
2/We: 20 Fr.Lt. [10D]
3/We: 6pdr H.A.
(1) Godinot's Brigade(Go) : Godinot : 3"A(6)+O
1/Go: 28 Fr.Ln. [14D]
Soult's Grenadiers (Gr) : Soult as above
1/Gr: 16 Fr.Gn.[6D]
10.4. SPECIAL RULES FOR ALBUERA
10.4.1 Game Length : 0900-1630 hours(16 Turns). The French are the First Side.
10.4.2. Arrival Times:
French 0900 or later; see rule 10.1.4 above
Spanish All Spanish units start on the table
British : 4th Division (Variable, see below)
All other British/Portuguese units start on the table
10.4.2.1. Cole's 4th Division was guarding the area to the north of the battlefield. The entire division enters as a reinforcement after the fighting commences (i.e Cole march ' es to the sound of the guns).
Roll for Cole's initiative normally in the command step, commencing the Allied Phases after firing or melee first occurs on the table. Cole is always outside Beresford's command radius until he arrives on the table. Make a note of the first occasion on which Cole first passes his initiative die roll. Cole's division arrives the following turn in the arrival phase on the north edge of the table on the Badajoz road in CONTINUOUS MARCH COLUMN.
10.4.3. Special Terrain Effects, the Albuera river.
The Albuera river south of the fork in [I, and all other streams on the map, are fordable in the normal way.
North of the fork, the Albuera river is a formidable obstacle to movement. It can be crossed using fording rules at the bridge or the ford. To cross elsewhere, the unit(s) seeking to cross must "find" a suitable fording place.
Procedure : When a unit in good order is within 1/2" of the river and facing the river, it can search for a ford by rolling one die. The only modifier is any appropriate leadership modifier. If the number exceeds the unit's UNMODIFIED response number, no ford has been found and the unit may move no further that turn. If a ford is found, the unit may start to cross, treating the river as rough terrain. After crossing the river, the unit is Disordered until such time as the entire unit is on the far bank and it has spent a phase not moving, in the normal way. Once a ford has been found, other units can cross it.
They do not need to search for a ford but are still disordered by crossing.
10.4.4. WEATHER
The weather during the battle was changeable, and sudden rain showers had a significant effect at one stage when a British Brigade was attacked by French Cavalry whose approach was masked by a rain squall.
The rain prevented the British muskets from firing, with disastrous results.
10.4.4.1. At the start of each game turn, the French player rolls percentile dice and refers to the WEATHER CHART printed below.
The result will be the WEATHER STATE for that turn. Cross reference the WEATHER STATE with the WEATHER EFFECTS CHART also printed below to see if there is any effect on the capabilities of units.
Players are free to copy the weather chart and record the current weather in the right hand column.
| WEATHER CHART WEATHER STATE | |||||
|---|---|---|---|---|---|
| TURN | CLEAR | MIST | FOG | RAIN | TORRENTS |
| 0900 | 01-20 | 21-70 | 71-90 | 91-98 | 99-00 |
| 0930 | 01-20 | 21-70 | 71-90 | 91-99 | 99-00 |
| 1000 | 01-17 | 18-45 | 46-70 | 71-95 | 96-00 |
| 1030 | 01-17 | 18-45 | 46-70 | 71-95 | 96-00 |
| 1100 | 01-16 | 17-43 | 44-68 | 69-94 | 95-00 |
| 1130 | 01-16 | 17-43 | 44-68 | 69-94 | 95-00 |
| 1200 | 01-08 | 09-19 | 20-41 | 42-61 | 62-00 |
| 1230 | 01-08 | 09-19 | 20-41 | 42-61 | 62-00 |
| 1300 | 01-08 | 09-19 | 20-41 | 42-61 | 62-00 |
| 1330 | 01-08 | 09-19 | 20-41 | 42-61 | 62-00 |
| 1400 | 01-42 | 43-68 | 69-93 | 94-98 | 99-00 |
| 1430 | 01-42 | 43-68 | 69-93 | 94-98 | 99-00 |
| 1500 | 01-42 | 43-68 | 69-93 | 94-98 | 99-00 |
| 1530 | 01-42 | 43-68 | 69-93 | 94-98 | 99-00 |
| 1600 | 01-60 | 61-90 | 91-00 | - | - |
| 1630 | 01-60 | 61-90 | 91-00 | - | - |
| WEATHER EFFECTS CHART | |||||
|---|---|---|---|---|---|
| WEATHER STATE | VISIBILITY RANGE | MOVEMENT | FIRING | % CHANCE OF BLUNDER COMBAT | |
| CLEAR | 36" | No effect | No effect | 0% | |
| MIST | 27" | -1" if moving 9"+ | No effect | 0% | |
| FOG | 18" | -1" if moving 6"+ | Max. 8" range | 10% | |
| RAIN | 27" | -1" all movement | -1 Inf. fire | 10% | |
| TORRENTS | 18" | -2" all movement | No Inf. fire -2 Art. Fire | 20% | |
10.5. COMMAND STRUCTURES and FATIGUE/DEMORALISATION LEVELS
10.5.1. French:
 Marshal Soult is an upper echelon commander in charge
of all French units and officers. French infantry officers (Girard,
Gazan, Werle and Godinot) are division commanders
subordinate only to Soult. The grenadiers treat Soult (only) as a
division commander with a command radius of 10", and cannot
derive command from LaTour (at right) or Soult. The fatigue level of the
cavalry is 2, and the infantry is 5. If cavalry becomes fatigued,
this does not affect the infantry, and vice versa. the morale level
of the army is 8, and rout/dispersal of infantry and cavalry both
count (e.g. if 8 infantry were routed and/or dispersed, the
cavalry would be broken, even if it had suffered no losses).
Marshal Soult is an upper echelon commander in charge
of all French units and officers. French infantry officers (Girard,
Gazan, Werle and Godinot) are division commanders
subordinate only to Soult. The grenadiers treat Soult (only) as a
division commander with a command radius of 10", and cannot
derive command from LaTour (at right) or Soult. The fatigue level of the
cavalry is 2, and the infantry is 5. If cavalry becomes fatigued,
this does not affect the infantry, and vice versa. the morale level
of the army is 8, and rout/dispersal of infantry and cavalry both
count (e.g. if 8 infantry were routed and/or dispersed, the
cavalry would be broken, even if it had suffered no losses).
10.5.2. British/Spanish :
Beresford is an upper echelon commander for all British and Portuguese units and officers. Blake is an upper echelon commander for all Spanish units and officers. All other Allied officers are Division commanders. British officers (including Beresford) have no effect upon Spanish units and officers for command purposes, and vice versa. The British/Portuguese Army has a combined fatigue level of 4 and a morale level of 5. Neither army's fatigue or Morale is affected by losses to the other army.
10.6. VICTORY POINTS:
The town of Albuera is worth 65/50, Hill A, Hill B and ford B are worth 45/35 Allied/French victory points each, and ford A 32/35. The French earn 10 points for each unit Northwest of ford A or exited off the North map-edge on or within 6" of the Badajoz road at the end of the game. French units which exit the map in this way may not return, but are not treated as routed/dispersed. All terrain objectives are Allied-controlled at the beginning of the game.
10.7 OPTIONAL HOUSE RULES:
These rules are used by the writer and his friends, but readers are free to ignore them.
10.7.1. Give all artillery a firing modifier of -1 in addition to it's printed modifier, except that no artillery basic modifier is worse than -2. Under these rule FRENCH AND BRITISH artillery are +1 not +2
10.7.2. If a cavalry commander fails, his initiative test, subordinate units may still have react markers placed on them. However, these units also recover half moN markers.
10.7.3. If a cavalry unit wins a melee (i.e. high modified die roll than the enemy) against any artillery unit or a routed unit, it does not suffer a winner loss.
10.8. HISTORICAL ALBUERA:
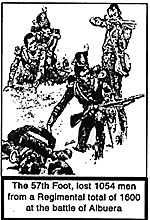
This was one of the bloodiest battles of the Napoleon Wars, in terms of the proportion of casualties to the numbers involved. Both the British and the French armies suffered approximately 33% casualties.
Noteworthy features of the battle included the Spanish fighting well, (at least some of them!), the destruction of British battalions by one regiment of Polish lancers and prolonged fire fight between British and French Infantry close range.
The day before the battle, British cavalry evacuated the woods on the east side of the map and retired to the west of the Albuera river. This understandably displeased Beresford, because it enabled the French to conceal their approach. Soult's troops camped that night in the woods. Next morning, Godinot's brigade and some cavalry made a feint attack on Albuera, while the bulk of the French Army manoeuvred around the west of what Soult thought was the British flank. The mist and hilly ground concealed the fact that the Spanish army had, unknown to Soult, arrived on the battlefield and deployed to the right of the British. The leading Spanish (Zayas) faced right (South) to hold up the French.
As the Spanish were beginning to buckle, the British infantry arrived. What followed was a slogging match between the British in line and the French in divisional columns. Ultimately, the French withdrew in some disorder, covered by their cavalry, the bulk of which was intact. The brunt of the attacks were borne by Zayas' troops and the outnumbered British infantry. It is generally acknowledged that the French came very close to winning the battle. Soult is reported to have said of the British infantry : "I pierced their centre. I turned their flank. The day was mine, and still they did not run."
DESIGNER'S NOTES
I enjoy Napoleon's Battles. The rules are not perfect, but they do provide the basis for enjoyable and playable wargames. One of the best features are the different characteristics that apply to different troop types. In Albuera, the differences between French, British and Spanish are highlighted in dramatic fashion. Because of the extensive commanders ratings in the scenario booklet, it is possible to reproduce on the battlefield the differences in characteristics of most historical generals of the period.
My sources for the order of battle were Glover's "The British Army in the Peninsular War" and the Clash of Arms board game "Albuera".
Given a scale of approximately 1/100 figure wise, and units of 16 to 28 figures, it was necessary to 'fudge' some of the unit sizes and W.'s. there were 1200 French grenadiers, and given a choice between 0 grenadiers and 1920, (1 x 16 man unit), I chose the latter and adjusted the number of line/light infantry accordingly. About 50% of the French Cavalry were dragoons. In Napoleon's Battles, dragoons are no better than light cavalry. If you object to this, add +1 to the dragoon's combat modifiers and subtract -1 from their movement rates. the French cavalry seemed to have several independent brigades. I chose to modify their command structure for play purposes. In my view, it gives the French too much flexibility if individual cavalry brigades can run around at will. In the battle, they operated in mass anyway.
The Spanish cavalry was a collection of small regiments, some light and some heavy. In order to give the Spanish player some decent units and to 'equalise' slightly the numbers of cavalry, I organised the Spanish cavalry in the manner provided in the game. the Guard unit is a combination of Guard and Irlanda regiments, who were better than the average infantry. Some Spanish infantry were militia, but not enough to provide a separate unit, so I scrapped them. The Spanish have enough dross without coping with militia.
The British cavalry were a combination of light and heavy dragoons. There were more heavies than lights, and I felt that giving the Allies 1 x British Heavy Cavalry unit would help play balance. they still suffer -4 on a recall, so they are hard to control once committed to combat. There were was not enough light infantry to justify a separate unit, and the light infantry were parcelled out among the various brigades anyway.
10.9. PLAYER'S NOTES.
The Allied player's major decision, if using free set up, is to decide where to deploy his units. If the historical deployment is used and the French do their historical attack, the French have an excellent chance of smashing the Spanish, before the British come to the rescue. The Spanish are very fragile, particularly in open terrain or exposed to cavalry attack. If the British deploy to the south against the French historical attack, the slow movement of the Spanish will leave the British out on a limb for a long time, assuming the Spanish are guarding Albuera.
The French have to plan their attacks in ignorance of the Allied set up. If they go for the left hook, there will be a battle where their cavalry will be useful. However, if the British are guarding Albuera and the Spanish are on their right, the French player might, as mentioned above, smash the isolated Spaniards. the French should go in hard against the Spanish. Once they are broken, as they will almost certainly be, with E dispersal level and 5 morale number, the French will have even numbers of infantry and 2:1 cavalry superiority with which to take on the British.
If the French go for the right flank in force, they can force a river crossing against the Spanish and constrict the battlefield to the area between Albuera and the woods to the north. A slogging match will then ensue unless the French try and outflank the Allies to the south.
I have not seen a French right flank attack against the British. If I were Soult in such a position, I would probably make a flank march to the south, screened by the rivers, and take on the Spanish south of Albuera. the battlefield is not overly wide and flanks can be covered with reasonable ease.
If the Allies weather the initial French attacks, their superior numbers of infantry will enable them to counter attack. However, one fascination of the scenario is that the British and Portuguese are equal in numbers of infantry to the French. The numerical superiority is made up of very 'iffy' Spaniards.
Perhaps some of you readers will try out this scenario and write up a report for First Empire. I would be interested to receive feed back on this article.
Albuera Errata
(From Issue #3--inserted here for convenience)
In issue 2, we printed the Albuera scenario for Napoleon's Battles by Andy Finkel. Unfortunately several errors crept into the printing of the article, and as editor I throw my hands up and confess my sins. Many of the errors were down to yours truly, so my apologies to both Andy and any readers who have attempted the scenario. On the last point recent communications with readers have shown that you have tried it and enjoyed it. Even down to suggesting other modifications to the scenario. So here are the bits that you need to amend.
Page 25
-
1. 2nd Paragraph. The third sentence should read: "Save as provided
in the special rules, use the basic Napoleon's Battles rules and any
advanced and optional rules you would normally use."
2. The Map.
-
(a) The top of the Map is the East. The Albuera river runs from
North East to the South.
(b) The grid co ordinates on the map were transposed. Reading from top to bottom, die letters should read D-C-B-A. The town of Albuera should be in C2, not B2
(c) The river crossing in C3 (amended) should be a ford and not a bridge.
3. Paragraph 10.1.4.1 Read "A" and "B" as "a" and "b" respectively.
Page 26
1. Para 10. 1.4.2. Free setup.
The following sentence was omitted, and should be inserted after the words 'initial placement'. "The Allied Player may deploy his initial forces anywhere North of the line c-d and West/Nortli West of the line d- e on the map, but not East of the Albuera River."
2. Para 5.10.2
-
(a) British Cavalry should read 1/BC:12Br.HC [4D]
(b) Spanish Cavalry Loy's ratings should be 3" G (5)+1
(c) Soult's ratings should be 10" E(10)+ 1
(d) Unit 1/1/V should read 20 Fr.Lt [10D]
(e) Unit 2/2/V should read 16 Fr.Ln [8D]
(f) Werle's ratings should be 4"G(6)+1
Page 27
2. Para 10.2.4.1. the map as printed does not show the Badajoz Road. This is the road leading off the North west comer in grid At (amended), (D1 on the map as published)
Para 10.4.3. The second line should read "The Albuera River south of the fork in C3
Page 28
A whole sentence was omitted. the third sentence should read "The Grenadiers treat Soult (only) as a division commander with a command radius of 10", and cannot derive command from any other officer. Latour Maubourg is a cavalry corps commander, subordinate to Soult. Cavalry division officers Bouvier d'Eclats and Bron derive command from Soult or Latour. The fatigue level..."
Para 10.5.2. the penultimate sentence should read "The British/ Portuguese army has a Fatigue level of 5 and a morale level of 7. The Spanish Army has a Fatigue Level of 4 and a Morale Level of 5. Neither Army's Fatigue Level...
Again my apologies to all who have attempted this scenario as it first appeared, I trust that the publication of the above amendments, will placate Mr. Finkel and encourage you try the scenario again.
Back to Table of Contents -- First Empire #2
Back to First Empire List of Issues
Back to MagWeb Master Magazine List
© Copyright 1991 by First Empire.
This article appears in MagWeb (Magazine Web) on the Internet World Wide Web. Other military history articles and gaming articles are available at http://www.magweb.com