Inspired by Jack Gill's With Eagles to Glory, Stephen presents a "factional" account of a recent wargame.
Historical Background
Bavaria had acquired the Tyrol from a defeated Austria in 1805. Stretching from the Bavarian border to the northern shores of Lake Garda in Italy, this alpine region had been associated with the Austrian Empire for over four hundred years. On April 10, 1809, as Archduke Charles crossed the Inn River and invaded Bavaria, the Tyrolians rose up against their Bavarian overlords. By the 13th, several thousand Bavarian and French troops together with their guns and equipment had been captured by the insurgents.
The only Bavarian unit still holding out was the small garrison in the fortress of Kurfstein located about 50 kilometres from Innsbruck, the Tyrolian capital. In May the first attempt to regain the Tyrol was unsuccessful. After defeating the Austrians around Regensberg, capturing Vienna, and preparing to do battle with Archduke Charles at Wagram, Napoleon ordered a second attempt be made to put down the revolt. The first phase would be the relief of the fortress at Kurfstein. The relief column con-sisted of Bavarian regulars and landwehr units, provisional French battalions, and units from other allied German states.
Relief Column Order of Battle
Commander: General de Division Count von Moulton
1st Brigade:
- 1st Battalion, Provisional Light Infantry Regiment (French)
1st Light Infantry Battalion (Bavarian)
12th Infantry Regiment (2 battalions) (Bavarian)
Garmisch Gebirgschutzen Battalion (Bavarian Landwehr)
Freiwilliger Jager Battalion (Bavarian Landwehr)
3rd Line Battery (6pdr. foot/6 guns) (Bavarian)
2nd Dragoon Regiment (3 squadrons) (Bavarian)
2nd Brigade:
- 2nd Battalion, Provisional Light Infantry Battalion (French)
7th Light Infantry Battalion (Bavarian)
14th Infantry Regiment (2 battalions) (Bavarian)
Rosenheim Gebirgsschutzen Battalion (Bavarian Landwehr)
Isarkreiss Mobile Legion Battalion (Bavarian Landwehr)
2nd Line Battery (6pdr. foot/6 guns) (Bavarian)
Mounted Gendarmes (2 squadrons) (Bavarian)
3rd Brigade:
- Hessian Lieb Fusilier Battalion
Wurttemberg Fuss Jager Regiment (2 battalions)
Wurttemberg Light Infantry Regiment (2 battalions)
Wurttemberg 2nd Foot Battery (8pdr/6 guns)
Wurttemberg 2nd Chasseur Regiment (3 squadrons)
Trains:
1st Pontoon Bridge Company (Bavarian)
3rd Sapper Company (French)
Assorted supply wagons and ammunition caissons (5)
The Rebels and Friends
Tyrolian Insurgents 4500+
* Commanding north of the river: Herr Kassidyberg, a former Swiss officer of Irish descent (They are everywhere!).
* Commanding south of the river: Herr Krigbaum, a slightly rotund, ex-soldier of dubious tactical proficiency (He owned a Gasthaus in Innsbruck and supplied enormous quantities of free beer when the rebels elected their leaders.)
Austrian Units
Commanded by Oberst Graf von Sharp, another expatriate Irishman late of His Majesty's 95th Rifles.
Line Infantry: 2 battalions
Jagers: 2 battalions
Landwehr: 2 companies
6pdr. Foot Battery (6 guns)
Grenz Irregular Cavalry (5 squadrons)
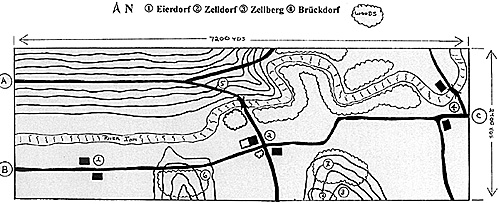
Terrain Restrictions:
The River Inn can only be crossed at the wooden bridge north of Zelldorf or the stone bridge at Bruckdorf, except individual riders (ADCs, messengers, scouts, etc.) can swim the river with their mounts. All buildings are of wood construction. Visibility in the woods is limited to 50 yards. Because of the difficult nature of the terrain north of the river no off-road movement of wagons and artillery is possible. Infantry and cavalry can move through the woods in open order.
The steep slopes north of the river are wooded.
Victory Conditions
The relief column, entering the board at "A" or "B" or both had to exit the board at "C" with less than 50% casualties and the majority (3) of the supply train intact.
General Moulton decided to split his column. Entering on the high road (A) under his personal command was the 3rd Brigade and the trains. The other two brigades under General de Brigade Norby's command entered on the river road in the valley (B).
Replay
Having advance knowledge of the approach of the relief column, the Tyrolian and Austrian leaders decided to make their stand at the village of Zelldorf. The battery was deployed at the cross-roads with two guns facing north toward the bridge and the re-mainder facing west. The village buildings were occupied by Tyrolians and the bridge prepared for burning. The Austrian infantry deployed behind the village and the Jagers and landwehr were hidden in the woods along the river northeast of Zelldorf. Two ambush sites were prepared and occupied by the rebels. North of the river, about halfway between the "Y" in the high road and the bridge, trees were dropped across the road to create an abatis. Several hundred Tyrolians took up covered positions on the uphill slope (5). South of the river, where the road crossed the ridge between Eierdorf and Zelldorf, another barricade was prepared and another group of rebels took up positions in the woods on the south side of the road (6). More Tyrolians were waiting in the woods on the Zellberg (7) and the Grenz squadrons were hidden on its reverse slope. To the east, other groups of rebels were preparing the buildings in the village of Bruckdorf.
NOTE: None of the Tyrolian/Austrian positions would be revealed to the column commanders until they had line-of-sight or an ambush was discovered by the use of flank guards (didn't happen).
On the high road, north of the river, General Moulton sent his chasseur squadrons ahead of the column. When the lead troop reached the "Y" in the road and started down toward the bridge the fallen trees were discovered. The chasseurs could also see that the rebels were attempting to set fire to the bridge. Sending word back to General Moulton that the road was blocked, the regimental commander took his squadrons down hill through the woods, bypassing the barricade, toward the bridge. Chasing the rebels off the bridge, and leaving a few troopers behind to stomp out the fires, the regiment continued across the bridge and was fired on by the Austrian guns. The chasseurs quickly moved into the woods on the east side of the road. General Moulton sent his sappers forward to clear the obstacle and they started receiving heavy fire from the Tyrolians hiding on the uphill slope. The 1st Fuss Jager battalion, which had come forward behind the sappers, immediately charged the rebel positions in open order. As the rebels ran off up into the forest, the 2nd Fuss Jager battalion came forward, and the entire regiment swept the woods on both sides of the road to the north end of the bridge. The rebels had vanished! The Jagers advanced across the bridge and received fire from the Austrian battery. Falling back across the bridge, they took cover in the woods on either side of the road. General Moulton ordered his battery forward; however, its place in the column was behind some of the supply wagons, so this would take some time.
In the river valley the 1st and 2nd brigades advanced through the village of Eierdorf. The 2nd Dragoons screened ahead of the column in open order. As they crested the ridge east of the village the troop on the road found the way blocked by fallen trees. In the distance they could see that the village of Zelldorf was occupied by the rebels and guns were deployed at the crossroads. The rebels in ambush positions south of the road opened fire on the halted dragoons and emptied many saddles. Pulling his squadrons back to the head of the column, the dragoon commander reported his sightings to General Norby, who sent his French light infan-try forward to clear the woods. A battalion of Bavarian light infantry was detailed forward along the road to support the French and remove the obstacle. The Garmisch landwehr and the 12th Infantry Regiment moved off the road to skirt the north end of the ridge.
In the woods north of Zelldorf an Austrian jager battalion advanced against the Wurttemberg chasseurs, forcing them across the road into the woods on the west side. At the north end of the bridge the Wurttemberg battery finally arrived and unlimbered. In order for the battery to come forward several wagons of the supply train had to be driven ahead up the left-hand road at the "Y". Now in position, the battery started firing at the Austrian guns. Between salvos, several companies of Austrian jagers and landwehr dashed across the road in pursuit of the hapless Wurttemberg troopers. The chasseurs finally exited the woods and rallied in the open near the river west of Zelldorf With the landwehr companies covering their rear on the south edge of the woods, the Austrian jagers deployed along the north edge of the woods to defend the bridgehead.
The barricade on the Eierdorf/Zelldorf road was cleared and the 3rd Line battery galloped cross-country to support the 1st Light Infantry Battalion, the Freiwilliger Jager Battalion, and the French Legers who were all advancing across the open plain south of Zelldorf. Taking casualties from the fire of the Wurttemberg battery and seeing that his flank was being turned, the Austrian commander moved his guns back to support his regulars, who were forming a battle line in the gap between Zelldorf and the north end of the Zellberg. The Tyrolians continued to defend the vil-lage buildings. On the western edge of Zelldorf the Garmisch landwehr charged a large force of rebels who had taken up a strong position behind some stone walls. A hand-to-hand melee ensued. South of the village, the 3rd Line battery crossed the road and unlimbered to engage the Austrian battle line. On the battery's left, the Freiwilliger Jagers and the 1st Lt Inf prepared to attack the other village buildings. On the battery's right, the French lights were moving up the slopes of the Zellberg after the rebels. The Bavarian 2nd Brigade was coming up fast to support the attacks of the 1st Brigade. The 2nd Provisional battalion of French light infantry was hurrying ahead of the brigade to join its sister battalion in the assault on the Zellberg.
Struggling up the steep slopes of the Zellberg, the French were heavily engaged by a large number of Tyrolians. Some of the companies of the 2nd French battalion moved into the gap in the woods and attempted to flank the rebels on the left. Above them, near the top of the Zellberg, they were surprised to see a lone, mounted figure frantically waving his hat in the air.
From the north end of the bridge the Wurttemberg Fuss Jagers charged over the river and into the woods to mix it up with the Austrian Jagers. High in the hills overlooking the river the Tyrolians who had been chased off earlier were returning. The wagons which had been side-tracked along the left-hand fork of the "Y" were sitting there defenseless. As the rebels approached from the east, the wagon drivers yelled for help. Running forward along the line of wagons came the pontoniers from the bridge company. Forming line in front of the lead wagon, their volley stopped the insurgents in their tracks.
While the Tyrolians milled around in conclusion, the Wurttemberg Light Infantry Regiment charged up the hill from the lower road. The rebels started to withdraw uphill and were hit in the flank by the Hessian Lieb Fusilier battalion, which had come up from the rear of the column through the woods in open order. Some of the rebels ran off down the road, but most disappeared into the wooded slopes to the northeast. As the drivers started to back up their wagons, the Hessians returned to their place at the end of the column, and the Light Infantry Regiment started downhill toward the bridge.
On the west edge of Zelldorf the Tyrolians repulsed the Garmisch landwehr assault against their position behind the stone wall. The 12th Infantry Regiment advanced against this rebel strong point. In the woods at the north end of the bridge the Fuss Jagers were successful in defeating the Austrian jagers, which retreated to the east to rejoin their sister battalion. Caught between enemy jagers at their backs and enemy cavalry in front, the two companies of Austrian landwehr surrendered to the Wurttembergers. At the other end of the bridge, the foot battery limbered up and prepared to cross the river.
The lone mounted figure on top of the Zellberg was the commander of the Grenz cavalry. He had been calmly sitting there watching the action on both sides of the river. Directly below his position were French light infantry struggling up the hill, and in the valley a Bavarian battery had unlimbered. Waving his cap in the air he signalled his squadrons forward at the charge. Pouring over the hilltop and down through the gap in the woods the Grenz irregulars caught many of the French lights in the open, but most were able to scurry into the woods. Many of the units in the open plain could see the cavalry charging down the side of the Zellberg and immediately formed square. The 3rd Foot battery only had time to fire a single salvo at close range before the Grenz were upon them. The Bavarians abandoned their guns and ran off.
As the undisciplined border horsemen were milling around, celebrating their great victory, they almost failed to notice the Wurttemberg chasseurs advancing on them from the north and the Bavarian dragoons closing in from the west. Not being able to ride back up the slopes of the Zellberg (their mounts were blown and the French lights would slaughter them), and receiving increased musket fire from the adjacent squares, they rode off toward the line of Austrian regulars formed up at the base of the Zellberg. Hot on their heels came the Bavarian dragoons. The Grenz rode through their own infantry, throwing them into confusion, and dashed off to the east. The 2nd Dragoons crashed into the disordered Austrian line, broke through, and scattered into the rear of the Austrian position. The dragoons had lost most of their officers during the charge and were totally out of control.
On the west side of Zelldorf the 12th IR had pushed the rebels out of their position behind the stone walls and were assaulting the buildings. The Freiwilliger Jager and 1st Light Infantry battalions attacked the other village buildings, but were repulsed by the rebels. South of the village, as the French light infantry cleared the woods, the 2nd brigade units were climbing the Zellberg to flank the Austrian position. North of Zelldorf General Moulten sent his Wurttemberg Light Infantry Regiment and foot battery across the river. Oberst von Sharp knew that his present position was becoming untenable, and gave orders for his units to start falling back toward Bruckdorf where the Tyrolians had been preparing the buildings for defence.
Having rallied the Grenz cavalry von Sharp positioned them to charge the enemy units who were crossing the Zellberg. This would help cover his with-draw to Bruckdorf Reluctantly, the rebels in Zelldorf also start-ed to abandon the buildings which they had defended so valiantly. With victory almost in their grasp, tragedy struck the allies' column.
North of the river, the wagons were slowly moving down toward the bridge when they were again attacked by the rebels. A small group of Tyrolians, under the personal command of Herr Kassidyberg, had slipped through the forest unseen and were upon the train before the Hessians at the rear of the column could react. Attacking the drivers and cutting loose the teams, the rebels quickly set fire to the ammunition caissons. The resulting explosions sent shock waves across the valley, and General Moulton knew the day was lost. With the loss of the supply and ammunition wagons there was no reason to continue his advance, so General Moulton ordered his units to rally on Zelldorf to prepare for their retreat back to Salzburg. The Austrian and Tyrolian leaders met at Bruckdorf to celebrate their success. Large quantities of beer, provided by Herr Krigbaum at an exorbitant price, were consumed by the insur-gents and their Austrian allies.
Back to Table of Contents -- First Empire #17
Back to First Empire List of Issues
Back to MagWeb Master Magazine List
© Copyright 1994 by First Empire.
This article appears in MagWeb (Magazine Web) on the Internet World Wide Web. Other military history articles and gaming articles are available at http://www.magweb.com