Frontal Assault at Kulmbach
Napoleonic Scenario
by Ian Barstow, UK
| |
How many wargaming scenarios have you fought where the umpire or whatever has gone to great pains to attempt to match the two sides as closely as possible, either by similarity in numbers or suitable redoubts and the like for the defender? Most of them, I should think. As a rule it is only a scenario depicting a real engagement which may be unbalanced, yet I find these unbalanced games the most interesting of all. All the great war stories seem to encompass a segment involving an attack which appears utterly pointless or in hindsight an enormous waste of life. The challenge to fight such a battle is that the attacker is presented with what in effect is a no win situation, yet because of orders from on high, he is obliged to push ahead despite the forthcoming carnage. What can thus be accomplished is limited as far as a normal victory is concerned, but for many real commanders this was the situation they were presented with like it or not. As a means of diversion from your usual run-of-the-mill scrap I present for your delectation a scenario which you should find practically impossible to win. You are a divisional commander in the army of your choice. Orders from on high have been received that your division is to launch the attack which the army commander believes will break the deadlock of a protracted battle. One look at the terrain will probably leave you with a feeling akin to "Sod this!", but unfortunately Major Generals do not tell full Generals to go forth etc. Having appealed to your Corps Commander he replies that he agrees entirely with you and it will be a shame to lose your division, but.....! Right, this is the nightmare scenario. It gets worse. Who are your favourite troops - the Old Guard, Crauford's Light Division, Neapolitan Velites (for the Editor)[Ed. Hurrah! for the boys!]. Whoever are your most beloved troops will comprise your division. For an 8 x 5 table at 1:33 I used 16 battalions in four brigades. You have thoughtfully been provided with artillery support but you will see from their positions, (marked 1-5 on the map, you may not deploy more than two batteries at any one site), that they are at extreme range (the distance from your guns to the enemy position should be about 800 - 1000 yards). What is worse you know the enemy to outgun you and as you do not directly control the guns they cannot be moved. Casualties Count I cannot emphasise enough that the assault troops should comprise your best as it is essential that every casualty taken is felt by you. The essence of the game is this. You must attack and attempt to carry the position, anything less and your honour will be compromised beyond question (if you lack honour with regard to your wargaming stop reading immediately, write out a classified ad and trade your Napoleonics in for some orcs). You may deploy in any formation that you require between points A and B on the map. Your aim should be to succeed as strongly as possible, that is put up a good show, and at the same time bring back what you can. If you win, then you should be imbued with the most amazing feeling of luck and gratification, or you made the defenders too weak. But who are my opponents? I hear you query. It really depends on who you are. Whatever numbers or points your system is based on the defender should be equal to you. Thus if you take the Old Guard then perhaps Austrian grenadiers or veteran British could be waiting. make it someone you dislike intently. It will help give the right ambience. They should also have as many guns as you, but with about half of them a higher calibre. I recommend about 40 guns for the attacker, comprised of whatever you fancy, (nothing heavier than 8 or 9pdrs!). Remember that at every stage of your force composition you will be influencing what your opponent will have. It may occur to you that the defender is on to a good crack here and it may be the case that you would rather a fellow wargamer did not see you suffer as you undoubtedly will. My advice is to tackle this one solo. Pick your force as you would normally and then select the defenders to fit in with the restrictions imposed. It is really a matter of preference whether you pick large numbers of inferior defenders or as I have suggested a similar type of opponent. Once you have deployed on the table look at the terrain the enemy holds (marked X-Y on the map) and using playing cards select one card per defending unit. Then add 20% more cards nominated as blanks. Shuffle the cards and then adopt the role of the defender and place the cards on the terrain where you feel suitable. The blanks should help keep you honest! Then deploy the troops and using common sense from their positions form them up into brigades, if you feel that way inclined. Then attack and do your best. TERRAIN AND DEPLOYMENT NOTES1. The defending troops positioned on the hills should be entrenched and their artillery in redoubts. Their only obvious weak spots are the open areas around the farm. 2. You may have your artillery deploy along the edges of the woods behind your start line. Your attack is scheduled for first light enabling you to deploy within enemy artillery range. Remember, your artillery will not move during the attack. 3. All woods are considered as dense except for the Orchard. 4. The solidity of the buildings is a matter of personal preference, although I would suggest that the enemy held farm be a solid affair. 5. The stream only hinders the movement of artillery, so no problem there, then. However, the marsh is impassable to formed troops, so you better pick a force with some skirmishers. If the defender (in solo mode) has any light troops deployed near the marsh they will move forward to contest any crossing effort. Similarly troops in the farm will move forward to the front fences to face the initial attack. 6. Toss a coin. Heads the defender will deploy his heaviest and best battery between the fenced area and the hill in order to cover the bridge that joins your deployment area together. Tails your in luck, he may only deploy infantry in this area or nothing at all. 7. Final bad news, you may not deploy more than half your force on each side of the stream. And off you jolly well go ....... and let's see some battle reports from you. It might be more entertaining if you write these as after action reports, detailing your heroic failures or glories. Perhaps starting as follows: Sire, I have the honour to report that at dawn this morning my division assaulted the enemy position at Kulmbach .......... What happened next is down to you! 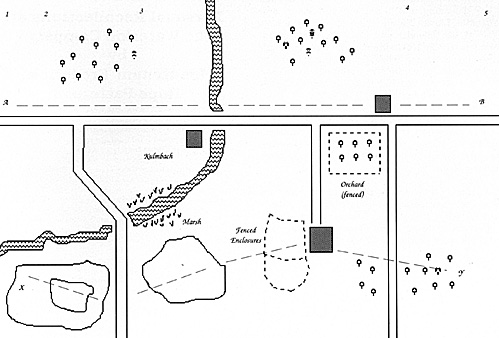
Back to Table of Contents -- First Empire #10 Back to First Empire List of Issues Back to MagWeb Master Magazine List © Copyright 1993 by First Empire. This article appears in MagWeb (Magazine Web) on the Internet World Wide Web. Other military history articles and gaming articles are available at http://www.magweb.com |