INTRODUCTION
 Historical Chronology of Valley and Peninsula Campaigns
This campaign largely came about as I was running out of historical ACW scenarios suitable for play in an evening at the Exiles club. As such, the primary reasons for putting it together was as a 'scenario generator' and to encourage players to look to the future when fighting on the tabletop. Put in another way I wanted battles to exist within a larger strategic framework and get beyond the 'it's the last turn so let's charge with everything as there's no tomorrow' syndrome.
When devising the campaign mechanics I wanted something that was both relatively easy for the players and hassle free for me. Therefore do not look on this as a detailed simulation of the historical campaign, this was not its purpose.
In the spring of 1862 the Confederate and Union armies stood uneasily confronting each other at Richmond, Virginia. The Union army under McClellan steadfastly refuses to advance until reinforcements are received. To the north Lincoln holds back 40,000 men under McDowell to cover Washington. The reason for Lincoln's caution is Confederate General Jackson in the Shenandoah Valley.
For the Confederates the problem was that McClellan (110,000 men) was advancing on Richmond from the east and that they only had 40,000+ under Johnston to oppose him. If McDowell was allowed to enter the Richmond area from the north the pressure on Richmond would be intolerable.
It was therefore decided that Jackson with a small force would operate in the Shenandoah Valley and so create a threat aimed at Washington. This would pull McDowell away from Richmond. The Confederates were confident that with McDowell unable to intervene around Richmond the cautious McClellan would be frustrated and his advance stymied.
THE VALLEY
The layout of the valley supported the Confederate plan. The area was cultivated intensively (the 'granary of the Confederacy') and the populace were staunchly pro South. There were good interior lines of communication within the valley and rather poor ones outside it. This would facilitate Jackson's movement and act as a 'force multiplier' for his small army. Harpers Ferry, at the north of the Valley was only 50 miles from Washington, therefore Confederate forces rampaging through this area would appear to pose a very real threat to the Northern capitol.
THE CAMPAIGN GAME BRIEFING
Note, I issued the same briefing and objectives to both sides at the start of the campaign for simplicity. You may prefer to tailor it for one side or the other or only give each side the objectives relevant to them.
THE CURRENT SITUATION
The only forces currently in the Valley are Jackson at Strasburg and Banks at Winchester facing each other. The Confederates have forces under Ewell and Johnson at the southern edge of the Valley. The Union have forces to the west of the Valley being gathered by Fremont for campaigning in West Virginia, to the east of the Valley they have more men who have been released from McDowell's command.
THE FRONT LINE
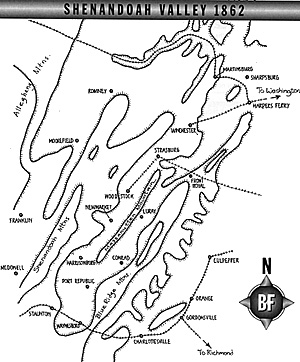 At the start of the campaign the front line is as follows: The Confederates control the following areas and all areas south: Gordonsville, Manassas Gap, Front Royal, Kernstown,
Jennings Gap. The umpire may wish to mark this on the map(s). The Union control the following
areas and all areas north: Brandy Station, Ashby Gap, Ashby, Winchester, Shenandoah Gap and
McDowell.
At the start of the campaign the front line is as follows: The Confederates control the following areas and all areas south: Gordonsville, Manassas Gap, Front Royal, Kernstown,
Jennings Gap. The umpire may wish to mark this on the map(s). The Union control the following
areas and all areas north: Brandy Station, Ashby Gap, Ashby, Winchester, Shenandoah Gap and
McDowell.
OBJECTIVES
Jackson must attempt to survive as long as he can ('always mystify, mislead and surprise the enemy') and pick the right moment to withdraw towards Richmond. Jackson should:
- Tie up Union forces,
- Capture as many supplies as possible,
- Destroy as many Union forces as possible,
- Note that the capture of any town west of the valley (e.g. McDowell) will end Fremont's West Virginia campaign and that the capture of Harpers Ferry, Leesburg or Centreville will prevent McDowell from joining McClellan and so end the Union advance on Richmond.
The Union must prevent Jackson from attaining any of his objectives and destroy him as quickly and completely as possible.
MAPMOVING
Players move their forces on the map. A force is generally a division, or concentration of divisions under a single leader. Forces move from box to box. You can only move to a box if it is connected to the one you are in by a communication line (rail, good road or poor road).
The road from Harrisonburg to Winchester is a good one. All other roads are poor.
A force can move 1 area a day (turn) by poor roads or two areas by the good one. A force can move an unlimited number of areas by railroad in a single turn (provided one exists) as long as the destination, departing point and all intervening areas are friendly controlled. Therefore at the start of the game a Confederate force could move by rail from Gordonville to Staunton in a single turn.
Note: The Confederates can never capture Manassas as the only way of reaching this point is by rail and it starts in Union control - and you can only move by rail if start, intervening and end points are all friendly controlled. See front line information. You can be deemed to control an area if you were the last (sole) force to move through it (or it was behind your front line at the start and the enemy have not moved through it). For reinforcements moving by rail into a contested area - this is allowed if your side is deemed to have established themselves in the area. Note that at the end of a turn all forces will always be in an area (never on a communication line).
All the above moves are in an ideal world, each commander (or force) has a percentage chance (some of these very large!) or doing nothing each day (based on their actual historical performance).
 All mountain passes (Gaps) are considered held by small cavalry contingents. Although you
will suffer only minor casualties forcing these, it may take you several days. Once you have forced a Gap it is then considered to be held by a small cavalry detachment from your army (no actual strength is deducted from your force - it's 'free').
All mountain passes (Gaps) are considered held by small cavalry contingents. Although you
will suffer only minor casualties forcing these, it may take you several days. Once you have forced a Gap it is then considered to be held by a small cavalry detachment from your army (no actual strength is deducted from your force - it's 'free').
Note that these detachments holding the passes cannot be recalled to field forces etc. They only exist to slow enemy passage through the Gaps.
At the start of the Campaign the Union controls the following Gaps: Shenandoah, Sydners, Snickers and Ashby. The Confederates control all the others (the umpire may wish to mark this on the map).
When enemy forces enter the same box a battle will normally occur.
SUPPLIES
A force is in full supply if within one move of a supply dump. Forces out of supply will be penalised on movement and ammo rules.
Confederate supply points are Strasburg, Staunton, Meechums Depot, Cross Keys and Winchester (note that Winchester is currently held by the Union. If not, any or all of these can supply Confederates. It was largely pro Confederate and this rule helps simulate this).
The Union starts with supply depots as Manassas, Harpers Ferry, Winchester, Franklin and Romney. These depots can be moved (slowly) and additional depots can be created and sent out from Harpers Ferry at any time. If a depot moves (or is ordered to move and fails) it cannot act as a supply point that turn (in other words to act as a supply source a depot must be ordered to remain stationary).
Should the Confederates capture a Union depot then they may use it or move it. Depots and supply dumps can supply any number of forces and are deemed to have an infinite amount of supplies available for the campaign.
Supply points are considered to have little or no defensive capability unless specific forces are detached to guard them.
Note that supply depots move in exactly the same way as forces, that is one turn a day by poor roads, 2 by good and an unlimited amount by rail.Note that to be in supply a force has to be within one turn's move of a depot. Therefore if both the force and the depot are on the good road the force can be 2 spaces away from the depot. It is possible for a force in Staunton to trace supply by rail to a depot in Manassas if all the boxes are friendly controlled.
These rules are obviously an abstraction but do away with any book-keeping requirements etc. If you want a more complex system please feel free to devise one. At the start of the game the umpire may wish to mark the Confederate supply points on the map.
REPLACEMENTS
Both sides will be allowed a number of replacements through the course of the campaign. Union replacements will appear at Harpers Ferry and Confederate at Meechums Depot. These replacements will take no active part until they are joined with a brigade and that brigade is then 'reorganised'.
The level of replacements is unknown and may consist of any or all of artillery, cavalry or infantry.
UNIT INTEGRITY
Brigades cannot be broken up, combined with others, have 'bits detached' etc. in any way. Brigades that exist at the start of the campaign stay together (note this worked well for me as I use Fire & Fury on the tabletop - those of you using a regimental combat system may wish to do something different).
COMMANDER AND UNIT QUALITY
Units that have been in battle may at the umpire's discretion receive a Battle Honour. Units receiving a number of such honours may rise in quality.
Commanders whose units perform well in combat may receive a Commendation. Commanders receiving a number of such Commendations may be rated 'Exceptional'. Units can only go down in quality by taking in a number of lower quality replacements. The only penalty for defeat is the losses you suffer (plus of course the strategic ramifications of such a defeat). Many units that ran in one battle stood bravely in the next.
COMBINED FORCES AND THE CHAIN OF COMMAND
Two or more divisions can combine into one force under one commander. This does not increase the forces ability to move (it may even decrease it due to the added logistical and co-ordination problems, not to mention the independent nature of some states) but will ensure that such combined forces stay and move together.
The Confederate chain of command in order of seniority is Jackson - Ewell - Johnson. In the Union army Fremont, Banks and Shields are all considered to be 'senior' commanders and cannot be subordinated to anyone. The other ('junior') commanders can be commanded by anyone (including another junior commander).
BRIGADE INDEPENDENCE
Brigades can be detached from their initial division and move independently on the map. How well the brigade does this depends on among other things the order given, the quality of the brigade commander, the quality of the divisional commander (who has sent the brigade on it's way) and the unit type (infantry or cavalry).
Note by and large (for simplicity and ease of control more than anything else) I tried to discourage lots of independent units running around the map. Essentially I was fairly tolerant of cavalry brigades acting independently so long as they remained within a move or so of their 'parent' division and frowned upon everything else.
REORGANISING DIVISIONS
I think it is generally preferable that divisional organisation stays as it is originally set out (this is after all a relatively brief campaign with many forces and leaders yet 'to find their feet'). However, if players want to switch brigades around I suggest the following.
They have to have a fairly good reason due to campaign events. Provided this is so, the division which receives the brigade (to be added to it) has to reorganise (see below) before taking an active part in operations once more. In addition, even once reorganised, the brigade which has been added to the division gets NO command control benefits from it's new leader on the battlefield (and should it's old commander also be present it gets no benefit from him either!).
BATTLE
Normally occurs when opposing sides contest the same box. This will be fought out using the umpire's choice of tabletop rules. The Umpire will arbitrate over who has been defeated, who holds the field etc. Defeated forces will normally fall back from the battle along the route they took to it or back along their lines of communication.
REST AND REORGANISE
After a battle, troops who are not lost will be either fit or unfit. Unfit troops can take no further part in action until their brigade is reorganised. A brigade reorganises in a similar manner to a map move i.e. taking 1 turn to do so (without moving) with adjustments for supplies, command, possession of the field, buildings (hospitals) and the current situation.
THE GAME
The umpire reserves the right to bend, add or ignore all rules in order to produce suitable tabletop battles (which is one of the main reasons for the campaign).
WARNING!
If you will be playing this scenario, DO NOT look at the Umpire Rules or Orders of Battle for either side as the capabilities of various leaders and units should not be hidden from both sides! You probably shouldn't read the replay, either, as it will influence your own deployments and uses. You have been warned.
Umpire Rules, Hints, and Tips
Game Replay
Game Map
Shenadoah Order of Battle (Confederate and Union)
Back to Battlefields Vol. 1 Issue 4 Table of Contents
© Copyright 1996 by Partizan Press.
This article appears in MagWeb (Magazine Web) on the Internet World Wide Web.
Other military history articles and gaming articles are available at http://www.magweb.com